How To backup MySQL DB on Windows severs

Backing up database is essential to eliminate the risk of losing data whenever there is a hardware failure or software issues. In this post, I’ll be showing the possible ways to create backups for MySQL databases.

In fact, There are several ways to Backup MySQL databases, you need to evaluate each one and select the best fit into your needs. I’ll list the possible ways, but I’ll be focusing on the data dump approach.

Types of MySQL backups:

  1. Logical: By using MySqldump utility, you will be able to create a data dump of your database. The Expected output is a .sql file that has all insert statement needed to re-create the database again.
  2. Physical: by coping the actual database files into another location. – This approach usually is recommended for huge databases as it is faster to do the backup and faster to restore in case of any failure. The limitation of this approach, is restoring the database has to be on the similar hardware as the original one.
  3. Partial: Partial backup is meant to have a backup of single table. This is usually useful when you wat to do a bulk operation on that table and you want to create a restore point in case of any failure happened.

For the purpose of this article, I’ll be focusing on the first option; Logical Backup. It is the easiest way as well as it is using a built in tool called mysqldump. This utility tool is being shipped with MySQL engine, Thus it will be installed by default on your MySQL Server. – So no third party tool needed.

You can create a .bat file to do the backup and get benefits of the built-in Windows Task Scheduler to have the backup done on daily basis. Let’s dive into it.

  • Creating backups for all databases on my MySQL engine:
mysqldump --user=root --password=******* --result-file="C:\MySQLdump.sql"  --all-databases

On this command line, you are telling mysqldump utility to have a backup of all databases and store it on the C:\MySqlDump.sql file. If you open the result file in any texts editor, you will find a normal sql statements to insert the data.

  • Creating Backup for a single database:
mysqldump --user=root --password=******* --result-file="C:\MySQLdump.sql"  --[DbName]

it is the same command as all databases, but you need to replace the all-databases option with the name of the database that you are looking for backing it up.

Advantages of using data dump approach over other options:

  1. You are not limited to specific MySQL version. The output of this dump, is normal SQL CRUD operations which means all what you need to do is to connect to the new MySQL engine and execute the datadump file.
  2. You can edit the datadump file in case you are looking to do few tweaks before executing it again.
  3. No 3rd party tools are needed. The MysqlDump.exe tool is built in utility and will be installed within MySQL installation.

For more information about mysqldump, please see the MySQL related documentation here

JQuery/JavaScript: how to split string based on Caps letter

In certain cases, you might got a need to change a string content in order to display it in more human readable format. recently I faced a need where I need to tokenize a string based on caps letter and add spaces between words

Using the built-in RegEx feature on Javascript, you can split the string and tokenize it based on the capital letters on the string. For example if you would like to split the string “TestStringValue” to be “Test String Value” you can simply use the following syntax:

/*split string based on Cap letter, then joins the resulted array elements with space between each array entry*/
split(/(?=[A-Z])/).join(" ") 

to try it, use the following code:

alert(  window.prompt("Tokenize String: ", "TestStringValue").split(/(?=[A-Z])/).join(" ")  )

Why do I need CRM Software

More businesses adopting the hybrid working style and mixing having employees on the office and working remotely. The nature of this model putting more pressure on management on how they will be managing businesses, team, customers and making sure they are doing really good job on that. Google, Microsoft and other giant software companies are moving into the hybrid model. But to be able to move to hybrid model or the remote-working model, you need to make sure that you have the right tools to empower employees and get the best out of them.

Being lucky and select the right CRM system (customer relationship management ) can empower your business like nothing else. Storing and managing customer and prospect information, will help your marketing team find new customers faster by boosting your lead generation speed. Ultimately, this will make you closing more deals and winning more customers. It will definitely make your customer happier and more satisfy with your service with integrating your help desk solution with CRM.

Being customer-oriented will be easier while having the right CRM solution and you will never lose the precious information. It will keep the whole team on the same page about the customer status and needs.

There are so many benefits of using CRM on your day to day business, with MS365 CRM, we built-it while keeping in mind the needs for you and your customers and we built it to be customer-oriented. Adopting MS365 CRM will help you:

  1. Being on top of your Massive lead generation and never miss any.
  2. Store and retrieve customer information like never before. You will not need anymore to depends on your memory or on your notebook to store customer information. It is all on the cloud.
  3. Managing teams remotely and easily
  4. Better customer service and better customer satisfaction.
  5. Build a long term customer relationship
  6. Generate reports that will help you making data analysis.
  7. Utilizing built-in dashboards that is helping you taking decisions based on data-points.

in order to get the most benefits of CRM, you need to have it customized and tailored to your internal process. There are general rules and processes that all businesses have in place but there will be some variance per each industry and business needs. It worth to mention that MS365 is a customizable CRM solution that our team can help you customizing it and making sure it is fitting into your business needs.

The main information about MS365 will be found on the this link http://crm.myspace365.com also you can send a contact us message and the CRM team will be contacting you within 1 business day.

How to loop through JSON Object using JQuery

Sometimes you get into a need where you need to loop through a JSON object while using JQuery or Angular 6 (with typescript). This is become very useful when you are not fully aware of what is the JSON object has in term of properties but you still needs to do some operations on the object properties..
So Let’s assume that you have a JSON Object called employee and you need to print the keys and values of these keys:

var employee = {
firstName: "FName",
lastName: "LName"
}

var keys = Object.keys(employee);

for (var i = 0; i < keys.length; i++) {
    console.log(keys[i]]); /*printing the key, so it will be firstName and lastName */
   console.log(employee[keys[i]]); /*printing the values; which will be FName and LName */
}

Note: This syntax is working fine with Angular 6 while using Type Script and with JQuery.

FATAL ERROR: CALL_AND_RETRY_LAST Allocation failed – JavaScript heap out of memory

Recently I faced a strange issue where I’m not being able to compile my Angular 7.0+ application because of the below error message

FATAL ERROR: CALL_AND_RETRY_LAST Allocation failed - JavaScript heap out of memory
1: node::DecodeWrite
2: node_module_register
3: v8::internal::FatalProcessOutOfMemory
4: v8::internal::FatalProcessOutOfMemory
5: v8::internal::Heap::MaxHeapGrowingFactor
6: v8::internal::Factory::NewJSPromise
7: v8::internal::interpreter::operator<<
8: v8::internal::NativesCollection<0>::GetScriptsSource
9: v8::internal::NativesCollection<0>::GetScriptsSource
10: v8::internal::NativesCollection<0>::GetScriptsSource
11: 00000044D2784281

I tried to upgrade the nodeJs and Angular version for my app but with no luck. I even tried to increase the RAMs on my development PC and that didn’t solve the issue.
In order to solve this issue, you will need to adjust the default nodeJs used spaces by using the following command:

node --max_old_space_size=8192 node_modules/@angular/cli/bin/ng build --prod --build-optimizer

Below is the original command that I was using and it was giving me the error in concern

ng build --prod --prod-optimizer

Using Bootstrap with Angular Project

Having bootstrap in any web project is becoming crucial because it is making developer’s life much easier and making the web project mobile-friendly portals. I’ve been using bootstrap for more than 8 years by now and it is becoming a main component for any project that I’m working on. In this post we will cover how to install bootstrap on Angualr project, we will be covering this step by step starting form creating a new angular project, below are steps:

  1. Open command prompt with admin permissions. To do so, on start menu search for “command prompt” and right click on it then select “Run as Administrator”
  2. Navigate to the location you want to store the project.
  3. Type the following command
ng new <Project Name>

it will be taking few minutes to download files from internet and creating the needed angular files for your project to run.

After this command completed, you will have angular project ready for run. But without bootstrap.

  1. Above command will create a new folder with your project name, navigate to it
  2. Type the following command on cmd
            npm install bootstrap jquery –save

           what above command do, is basically instructing npm to download and save bootstrap and jquery for you on the project.

  1.  Now you have bootstrap installed on your project. Let’s try to run the project, type the following command:
                  ng s -o

              sometimes, you will get the following error message

              “node_modules/rxjs/internal/types.d.ts(81,44): error TS1005: ‘;’ expected”

             To fix this issue, we need to use older version of RX to do that type the following command

                            npm install rxjs@6.0.0 –save
  1. Try run the project again.. it should be working. Next is to import the needed css files and js, Open angular.json file with any text editor file
  2. On styles tag, add the following value which is basically CSS path

               “node_modules/bootstrap/dist/css/bootstrap.min.css”

        On script tag, add the following values which is basically JS path

                 “node_modules/jquery/dist/jquery.min.js”, 

                 “node_modules/bootstrap/dist/js/bootstrap.min.js”

  1. Try to run the project using the following command
ng s -o

              you should be getting the new project open on your web browser. To test if the bootstrap is installed correctly or not, basically you can open app.component.html and add the following tag

<button class=”btn btn-primary”>test bootstrap</button>

By doing above, you will get a blue button on the main page.

Agile Software Development Principles

It has been proven that Agile software development life cycle is the best approach to follow. it is making sure the client is more engaged into the development cycle, which is in turn reflecting on the project success. Some basic agile Software Development Principles:

  1. Satisfy client by continuous delivery of valuable-workable software components/modules.
  2. Welcome changes even in late development cycles
  3. Deliver Workable software frequently, the shorter Agile sprints the better.
  4. Keep client’s business people involved and work closely with them to get the project completed.
  5. Make sure to have team of motivated and trusted individuals from both parties; client and development team.
  6. Communicate frequently with client and make sure they are part of the process
  7. The deliverable are the primary measurement for project progress
  8. It is essential to do the simplest thing that works and satisfy client needs. Don’t seek for complicated solutions that overwhelmed the development
  9. Make sure your team is self-organized. Having self-organized team will produce high quality software on time/budget/quality.
  10. Always always always check how make things better and easy on everybody. This will make your team and your client more effective, which means moving towards the goal faster

These are the basic Agile Software development principles and of course there is more. I always recommending to go with Agile development approach, it is proven to have project succeeded over other approaches.

#AgileSoftwareDevelopment #AgilePrinciples

MS SQL Management Studio Snippet

It is normal to keep writing very similar SQL statements while working on database logic. Over the course of the past 10 years, I’ve been using SQL Prompt from RedGate in order to make my life easier while writing repeated SQL statement, it is very nice tool that is integrated with SQL Server Management Studio (SSMS). I mean by repeated statement things like “Select * from “, “Select Count(1) from “, etc… to a more complex statement which is checking what is being running currently on specific database. well, I can save these complex statement into files and just keep opening these files and use them. But that’s takes time. RedGate SQL Prompt, is relatively expensive tool specially when you need to purchase it to for your large team.

There is a cool feature on SSMS that helps me solving this issue. which is basically code snippet. which I save certain queries on SSMS IDE and use it later on. in order to do that I follow the following steps:

1. Open Notepad or any text editor, paste the below XML

<?xml version="1.0" encoding="utf-16"?>
 <CodeSnippets>
 <CodeSnippet Format="1.0.0">
 <Header>
 <Title>createIndex</Title>
 <Shortcut>createIndex</Shortcut>
 <Description>Create Index</Description>
 <Author>Yasser Jaber</Author>
 <SnippetTypes>
 <SnippetType>Expansion</SnippetType>
 </SnippetTypes>
 </Header>
<Snippet>
 <Declarations />
 <Code Language="sql"><![CDATA[

You SQL Snippet Goes here

]]></Code>
 </Snippet>
 </CodeSnippet>
 </CodeSnippets>

2. Before saving the file, change the text “You SQL Snippet Goes here” to your repeating sql statement.

3. Save the notepad with extension .snippet

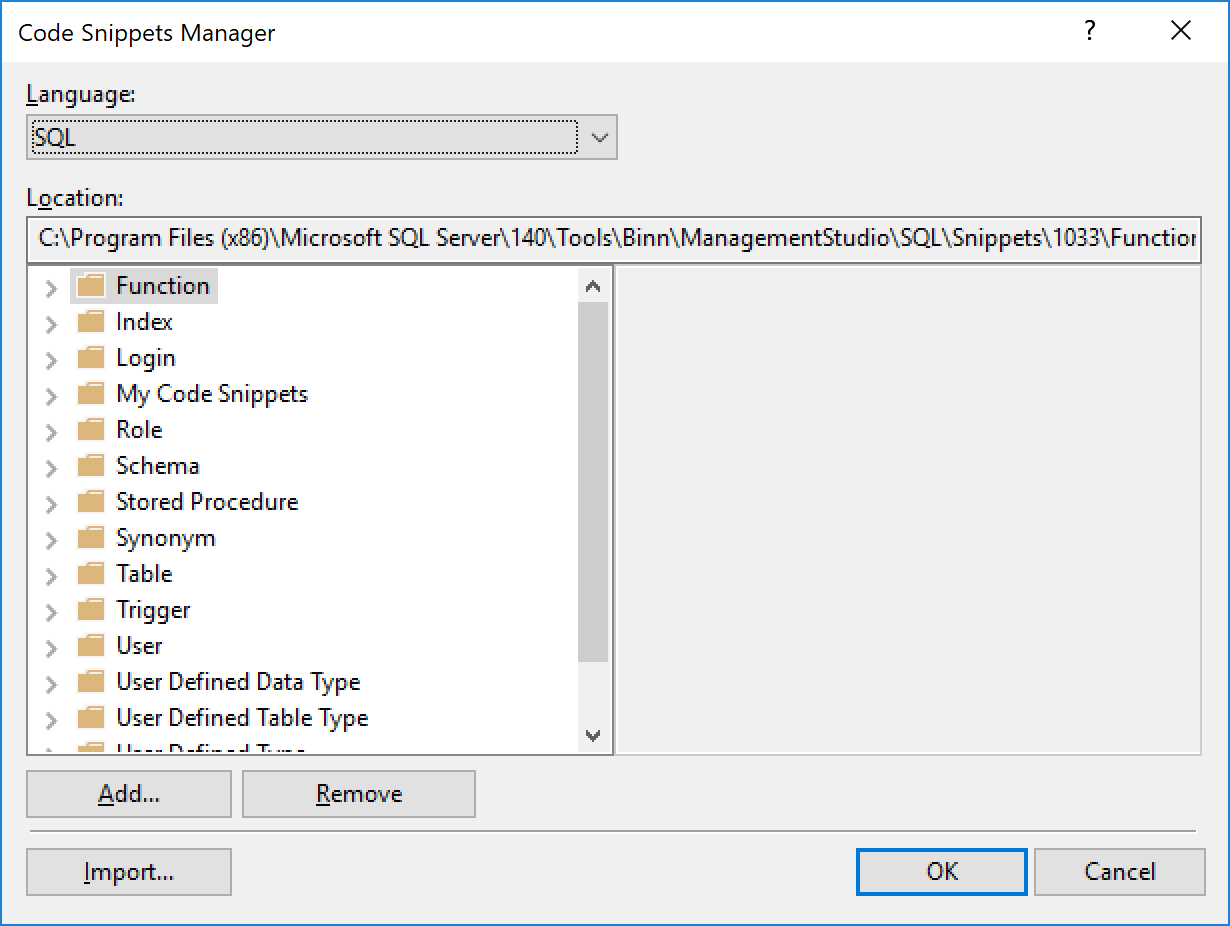
4. On SSMS, select Tools menu , then ‘Code Snippets Manager‘, this will bring below popup

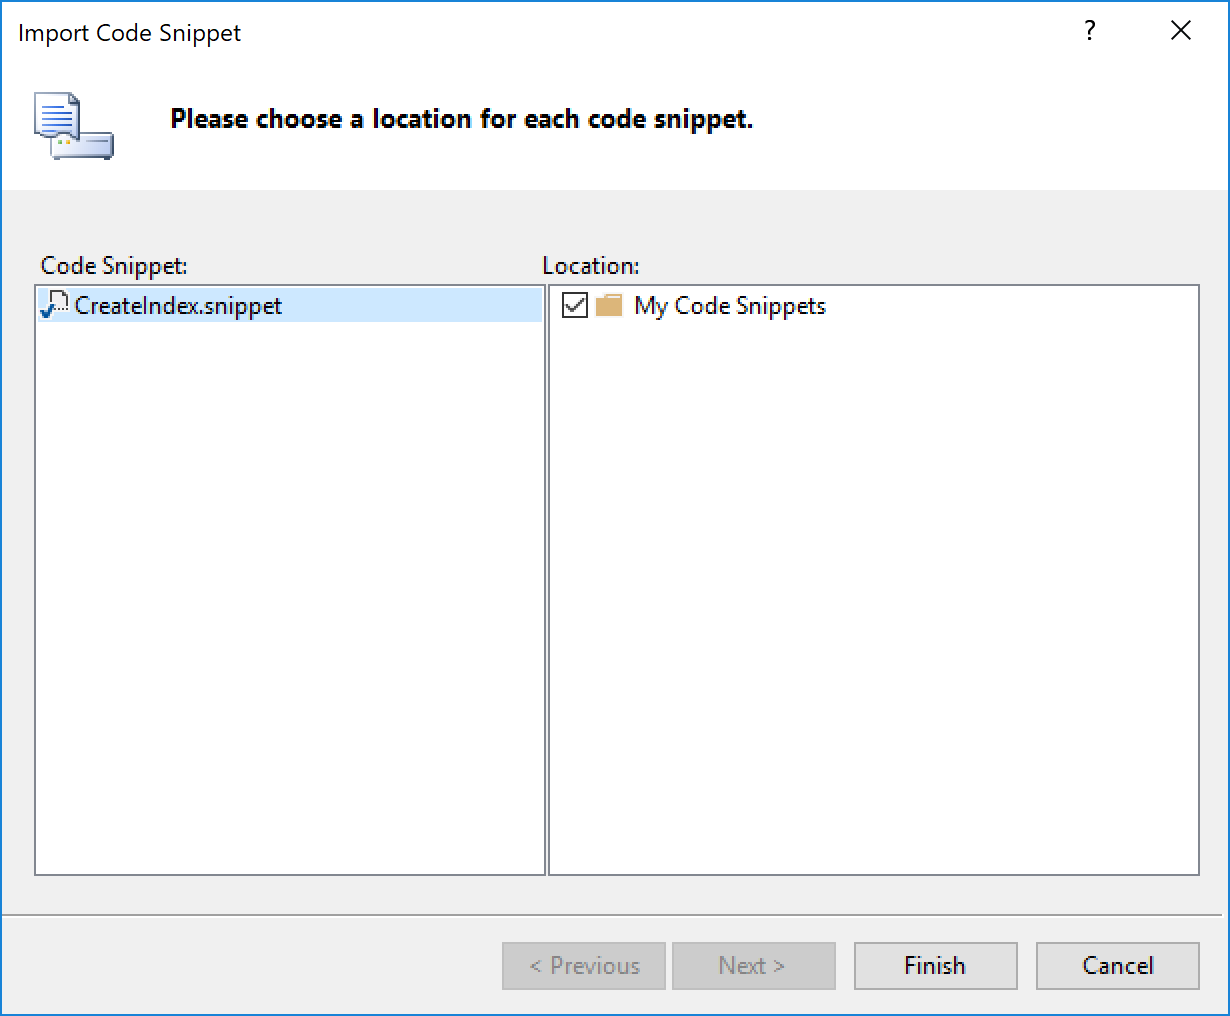
5. Click on Import, navigate to where you saved the notepad file, and select it. choose the folder that you want to have the snippet to show

By doing above steps, you will have new snippets imported into your SSMS IDE. to use you, do right click, click on “Insert Snippet”, select your correct folder, then select your correct Snippets.

How to get the off screen window back (windows 10) ?

Couple of days ago, I came across a very small issue but it is really annoying one. my chrome’s development tool went off screen and I couldn’t get it back on screen. it was completely invisible to me and I couldn’t see it any where but on windows 10 status bar. to overcome this issue, I used a simple trick on windows 10, which is

pressing Right-Shift and clicking on the chrome’s development tool on status bar.

doing so, windows 10 brought to me a context menu where I could click on Maximize which maximized the window on my screen again.

How to solve Access-Control-Allow-Origin

When you are trying to do an http post from your Jquery, Angular or any client side script language to an web API that has a different domain name as yours, you will be getting error on the web browser that says:

No ‘Access-Control-Allow-Origin’ header is present on the requested resource. Origin ‘null’ is therefore not allowed access.

This is happening because the website and web API has a different domain names. solving this issue can be done using the following steps:

  1. On the wbe API project, Right click References and select “Manage Nuget”
  2. Search for “Cors” and install “Microsoft.AspNet.WebApi.Cors” , this will install a new dll to your project; System.Web.Http.Cors
  3. go to App_Start/WebApiConfig.cs file
  4. Add using statement  to include System.Web.Http.Cors
  5. On Register method, add the following 2 lines
    var cors = new EnableCorsAttribute("*", "*", "*");
    config.EnableCors(cors);

    the EnableCorsAttribute has the following parameters:

Origins:  Comma-separated list of origins that are allowed to access the resource. Use “*” to allow all.
Headers: Comma-separated list of headers that are supported by the resource. Use “*” to allow all. Use null or empty string to allow none.
Methods: Comma-separated list of methods that are supported by the resource. Use “*”  to allow all. Use null or empty string to allow none.