Refactoring Code: What Benefits you will gain vs Risks that you have to face

Code Refactoring is an old and new topic that will never die. while it comes with huge benefits to your organization and clients there are some risks that you need to address and plan for it. I’ll be starting by listing some of the benefits of code refactoring and what you will gain once you decide to into this path:

  1. Improved Maintainability: By following the right procedures during code refactoring, it increases the readability of the code and code code clarity, which is ultimately will facilitate maintenance and troubleshooting/bug fixes.
  2. Technical Debt Reduction: By resolving code odors and inefficiencies reduces the need for upkeep in the future. There is no doubts this pay off late one down the road
  3. Performance Enhancements: Users and system resources both gain from quicker running code by adopting better algorithms and techniques .
  4. Scalability: Refactoring makes your codebase more capable of handling growth and increases in demand. Which means you can handle more clients or client’s business growth
  5. Team Productivity: Ultimately you will notice a better team productivity as a result of the above points; Quick development cycles and improved cooperation are two benefits of clean code.

Below are some of Risks that you may face during the code refactoring project:

  1. Time: Code Refactoring will consume time from the team in order to accomplish it, while clients can’t be on stand by and will continue asking for fixes/improvements, Developing new features requires time away from refactoring. I personally have been in this situation while client demanding for new features while we are running the internal refactoring projects, The only mitigation solution for this is to Make sensible priority lists and get client engage with you in the refactoring projects. Maybe you can split the big refactoring projects into smaller projects.
  2. Bugs: Updates and changes could bring up new problems. So the thorough testing is necessary – Having tests is a must after refactoring. I believe this will help building a better understanding with your Testing team.
  3. Scope Creep: Refactoring may go beyond what was initially intended due to scope creep. Clearly define your bounds and make sure you will not go beyond it.
  4. Backward compatibility: When reworking legacy systems, ensure legacy compatibility. Make sure it works backwards. So when you go live, you will not be impacting existing clients.
  5. Keep it simple and DO NOT over-engineer: do not introduce the needless complexity. Simplicity is the key.
  6. Time and Efforts will ultimately translated to money. this will be extra cost on your organization. but remember it is investment you are making to have a better code base and have a better client service/robust system

The Power of CRM Solutions in Driving Business Success

MS365 Dashboard Sample

In today’s competitive business landscape, CRM (Customer Relationship Management) is so important for driving organizational success. Discover the key reasons why integrating CRM is vital for pushing your business forward. Below is a shot list of benefits that you might get when you adopt CRM and using it on your daily work: 

1️⃣ Operational Efficiency: Streamline your operations and enhance collaboration across teams, which in turn it will boost productivity and efficiency. 

2️⃣ Personalized Engagement: Tailor your interactions to meet individual customer needs, leveraging CRM insights to craft targeted strategies and enhance overall satisfaction. 

3️⃣ Improve Customer Loyalty: Nurture lasting relationships with existing customers by leveraging CRM to identify growth opportunities and promptly address concerns, improving long-term loyalty.  

4️⃣ Data-Driven Decisions: Make informed decisions backed by actionable insights provided by CRM, from sales forecasts to customer behavior trends, driving revenue growth and success. 

🌟 Elevate Your CRM Experience with MS365 Cloud Solutions 🌟 

Take your customer relationships to new heights with MS365 cloud-based CRM.  MS365 CRM offers a suite of tools to streamline operations, personalize interactions, and optimize revenue generation. 

Ready to enhance customer engagement and drive revenue growth? Contact us to learn more about how MS365 CRM can empower your business! 

#CRM #CustomerEngagement #MS365 #CloudSolutions #BusinessGrowth #CustomerSuccess #RevenueOptimization

Using MS Word Templates with MS Dynamics 365

In today’s digital landscape, efficiency is paramount in business operations. Microsoft Dynamics 365, an integrated suite of business applications, offers robust tools for streamlining various processes, including document management.

Word templates within Microsoft Dynamics 365 are invaluable assets, allowing users to expedite document creation while maintaining brand consistency and professionalism.

Crafting Word Templates in Microsoft Dynamics 365:

  1. Select the Relevant Entity: Navigate to the appropriate entity within Dynamics 365, such as Leads, Accounts, or Opportunities.
  2. Access the Command Bar: Locate the command bar on the entity page and choose “Word Templates” from the menu.
  3. Initiate Template Creation: Click “Create Word Template” to begin designing your template.
  4. Design Your Template: Utilize the Dynamics 365 template designer in Microsoft Word to add dynamic data fields using predefined merge tags, ensuring personalized content.
  5. Customize Formatting: Align fonts, colors, and styles with your brand guidelines for a cohesive look.
  6. Save Your Template: Save the template within Dynamics 365, specifying the entity it corresponds to for easy retrieval.

Utilizing Word Templates in Microsoft Dynamics 365:

  1. Access the Desired Record: Navigate to the specific record within Dynamics 365 for document generation.
  2. Select the Template: In the command bar, choose “Word Templates” and select the desired template from the list.
  3. Generate the Document: Click “Create Word Document” to generate the document based on the selected template.
  4. Review and Edit: Open the document in Microsoft Word to review and make any necessary edits.
  5. Save and Share: Save the finalized document and share it directly from Microsoft Word with relevant stakeholders.

How to Remove Shared CRM View from database

CRM View

Microsoft CRM is very dynamic platform, it is helping collaborate and interact with team members. One of the cool features on Microsoft CRM, you can built View and share it with other team members.. But what happen, if you as an end user want to see this view anymore and you don’t have control to remove it! on this post, we will show you how to remove the shared CRM view from database.

Because of the nature MS CRM dynamicity, there will be a challenge to figure out and delete the sharing metadata.

The good side of this, all metadata is stored in the MS CRM database, thus you can manage that by updating database. I would like to highlight here, this is not recommended by Microsoft and you can do it in case you ran out of options but there is no guarantee from Microsoft this is will be working for you as well. I personally tried couple of times and worked fine with me.

I’m strongly recommend to take backup of your database before applying this change, so you have a backup point in case something went wrong.

DECLARE @userId UNIQUEIDENTIFIER = 'User ID whom have the view shared'

update PrincipalObjectAccess
set AccessRightsMask = 0  --Remove sharing
where PrincipalObjectAccessId in(

  select  poa.PrincipalObjectAccessId
  from PrincipalObjectAccess      poa
     inner join FilteredSystemUser u 
        on u.systemuserid = poa.PrincipalId
     inner join UserQuery uq 
        on uq.UserQueryId = poa.ObjectId
  where 
        poa.ObjectTypeCode = 4230
     and u.systemuserid = @userId
     and uq.Name in( 
        'Target View Name to remove it'
        )

 )

How to Send an Email in C# using gmail

Send an Email

It is becoming common these days to send an email from your application to specific list of users. Usually this is to notify users or administrators of certain action happened. As example of this, Notify administrator if an error happened in certain module, or notifying manager to approve/decline a request.

Thankfully, sending emails from .net applications (desktop or web) is becoming easy task to accomplish. Here is a sample code that utilizing gmail smtp to send an email. You can use the same steps to send email from outlook.com or office365.com, you will need to change the configurations in emailSettingInfo object

public void SendEmail()
{
    string sender, recipient, ccList, bccList, smtpSenderPassword;
    //Prepare SMTP Setting
    var emailSettingInfo = new
    {
        SmtpSenderEmail = "<<Sending Email Address Goes here>>",
        SmtpSenderPassword = "<<Sending Email Password Goes here>>",
        SmtpClientHost = "smtp.gmail.com",
        SmtpPortNumber = 587,
        SmtpEnableSsl = true
    };

    //Get the Email body ready
    var emailInfo  = new {
        ToEmailAddress = "<<Your email goes here>>",
        Subject = "Send Email from C# Code",
        Body = "Hi, this is a test email",
        CcEmailAddress = "<<CC List>>",
        BccEmailAddress = "<<Bcc List>>",
    };

    sender = emailSettingInfo.SmtpSenderEmail;
    recipient = emailInfo.ToEmailAddress;
    smtpSenderPassword = emailSettingInfo.SmtpSenderPassword;

    //Intialise Parameters  
    SmtpClient client = new SmtpClient(emailSettingInfo.SmtpClientHost);
    client.Port = emailSettingInfo.SmtpPortNumber;
    client.DeliveryMethod = System.Net.Mail.SmtpDeliveryMethod.Network;
    client.UseDefaultCredentials = false;
    System.Net.NetworkCredential credentials = new System.Net.NetworkCredential(sender, smtpSenderPassword);
    client.EnableSsl = emailSettingInfo.SmtpEnableSsl;
    client.Credentials = credentials;
    try
    {
        var mail = new System.Net.Mail.MailMessage(sender.Trim(), recipient.Trim());

        mail.Subject = emailInfo.Subject;
        mail.Body = emailInfo.Body;
        mail.IsBodyHtml = true;
        if (!string.IsNullOrEmpty(emailInfo.CcEmailAddress ))
        {
            ccList = emailInfo.CcEmailAddress;
            foreach (var email in ccList.Split(";".ToArray()))
            {
                mail.CC.Add(new MailAddress(email));
            }
        }

        if (!string.IsNullOrEmpty(emailInfo.BccEmailAddress ))
        {
            bccList = emailInfo.BccEmailAddress;
            foreach (var email in bccList.Split(";".ToArray()))
            {
                mail.Bcc.Add(new MailAddress(email));
            }
        }

        client.SendCompleted += (s, e) => {
            client.Dispose();
            mail.Dispose();
        };

        client.Send(mail);//send the email
                
    }
    catch (Exception ex)
    {
        //Do Erorr Handling logic
    }
}

Angular PDF Viewer Component

You may come over a requirement to view PDF within your Angular 5+ application. Building that from scratch might be a time and effort consuming task. Thanks to ng2-pdf-viewr component, it is providing the developers with a ready made component that you can import into your Angular project and start using it in very easy way.

In my case scenario, The PDF Viewer latest version (7.0.1) didn’t work and it was giving me compilation issues whenever I’m try to compile my application. So I had to use an older version in my Angular project (I used version 6.4.1). By using the 6.4.1 version, I overcome the compilation issue.

I order to use the ng2-pdf-viewer, it is basically consist of few steps:

  • Install the component to be part of your project
npm i ng2-pdf-viewer@6.4.1  --save
  • Compile your application to make sure new component will be compiled successfully
  • Add PDF Viewer module to your module class
import { NgModule } from '@angular/core';
import { BrowserModule } from '@angular/platform-browser';
import { AppComponent } from './app/app.component';

import { PdfViewerModule } from 'ng2-pdf-viewer';

@NgModule({
  imports: [BrowserModule, PdfViewerModule],
  declarations: [AppComponent],
  bootstrap: [AppComponent]
})

class AppModule {}

platformBrowserDynamic().bootstrapModule(AppModule);
  • Add PDF Viewer html tag to your html page and make sure the pdf URL is pointing to a valid pdf file.
import { Component } from '@angular/core';

@Component({
  selector: 'my-poc-app',
  template: `
  <pdf-viewer [src]="pdfSrc"  style="display: block;" ></pdf-viewer>
  `
})
export class MyPOCComponent {
  pdfSrc = "https://blog.smartdigitizers.com/wp-content/uploads/TestPDFFile.pdf";
}

References:

https://www.npmjs.com/package/ng2-pdf-viewer/v/6.4.1
https://www.npmjs.com/package/ng2-pdf-viewer

Top 5 Reasons Why CRM is Important for Businesses

CRM Dashboard
Sample MySpace365 Dashboard

Customer Relationship Management (CRM) systems are becoming more important to overcome the operation issues and getting satisfied customers. I’m listing below the top 5 reasons why I believe you need to have CRM system in place.

  • Client Management
    CRM system helps you to get more visibility into your client base, ponder the tactics needed for long-term profitability, and formulate better plans that impede your staff to break new operational ground.
  • Profitability Tracking
    They no longer need to worry about tracking every cent of revenue and focusing on shipping costs, product discounts, and client returns. Revenue calculations will be a matter of reporting issue on the CRM. Also tracking your client invoices and payments will be within the CRM system. It will also be providing notification tool for you to make sure you are collecting payments in timely manner.
  • Regulatory Compliance
    This is a winning approach in the long term, especially when it helps you comply with your country rules and industry standards. You can instruct the CRM to flag a high-risk client or generate the relevant documentation based on the client’s risk score.
  • Sales Strategy
    As a business owner, the last thing you want is to lose income by targeting the wrong customer segment. Client administration programs can provide you valuable intelligence about long-term sales trends, helping you adjust the existing corporate sales strategy and results tactics, which is ultimately will turn into more revenue coming in the pipeline.
  • High Customer Satisfaction Rate
    CRM can improve a company’s customer service practices, helping employees respond to clients’ queries quickly and effectively. The CRM enables your company to understand what it takes to build an effective customer outreach policy and boost sales. Before selecting a customer tracking program, make sure it fits your company’s operating processes, industry, revenue cycle, and customer base.

While keep in mind the best CRM practices, Smart Digitizers is offering a cloud-based CRM System; MySpace365. I encourage you to read more about it and reach out to them to get better understanding of how this can fit into your needs.

flutter doctor –android-licenses gives a java error

After installing flutter on my development environment, I face flutter doctor android license issue while I was checking the installation with below command:

flutter doctor --android-licenses
Exception in thread "main" java.lang.NoClassDefFoundError: javax/xml/bind/annotation/XmlSchema
    at com.android.repository.api.SchemaModule$SchemaModuleVersion.<init>(SchemaModule.java:156)
    at com.android.repository.api.SchemaModule.<init>(SchemaModule.java:75)
    at com.android.sdklib.repository.AndroidSdkHandler.<clinit>(AndroidSdkHandler.java:81)
    at com.android.sdklib.tool.sdkmanager.SdkManagerCli.main(SdkManagerCli.java:73)
    at com.android.sdklib.tool.sdkmanager.SdkManagerCli.main(SdkManagerCli.java:48)
Caused by: java.lang.ClassNotFoundException: javax.xml.bind.annotation.XmlSchema
    at java.base/jdk.internal.loader.BuiltinClassLoader.loadClass(BuiltinClassLoader.java:581)
    at java.base/jdk.internal.loader.ClassLoaders$AppClassLoader.loadClass(ClassLoaders.java:178)
    at java.base/java.lang.ClassLoader.loadClass(ClassLoader.java:521)
    ... 5 more

That was not the expected result as I follow the installation instructions step by step documented on flutter official site.

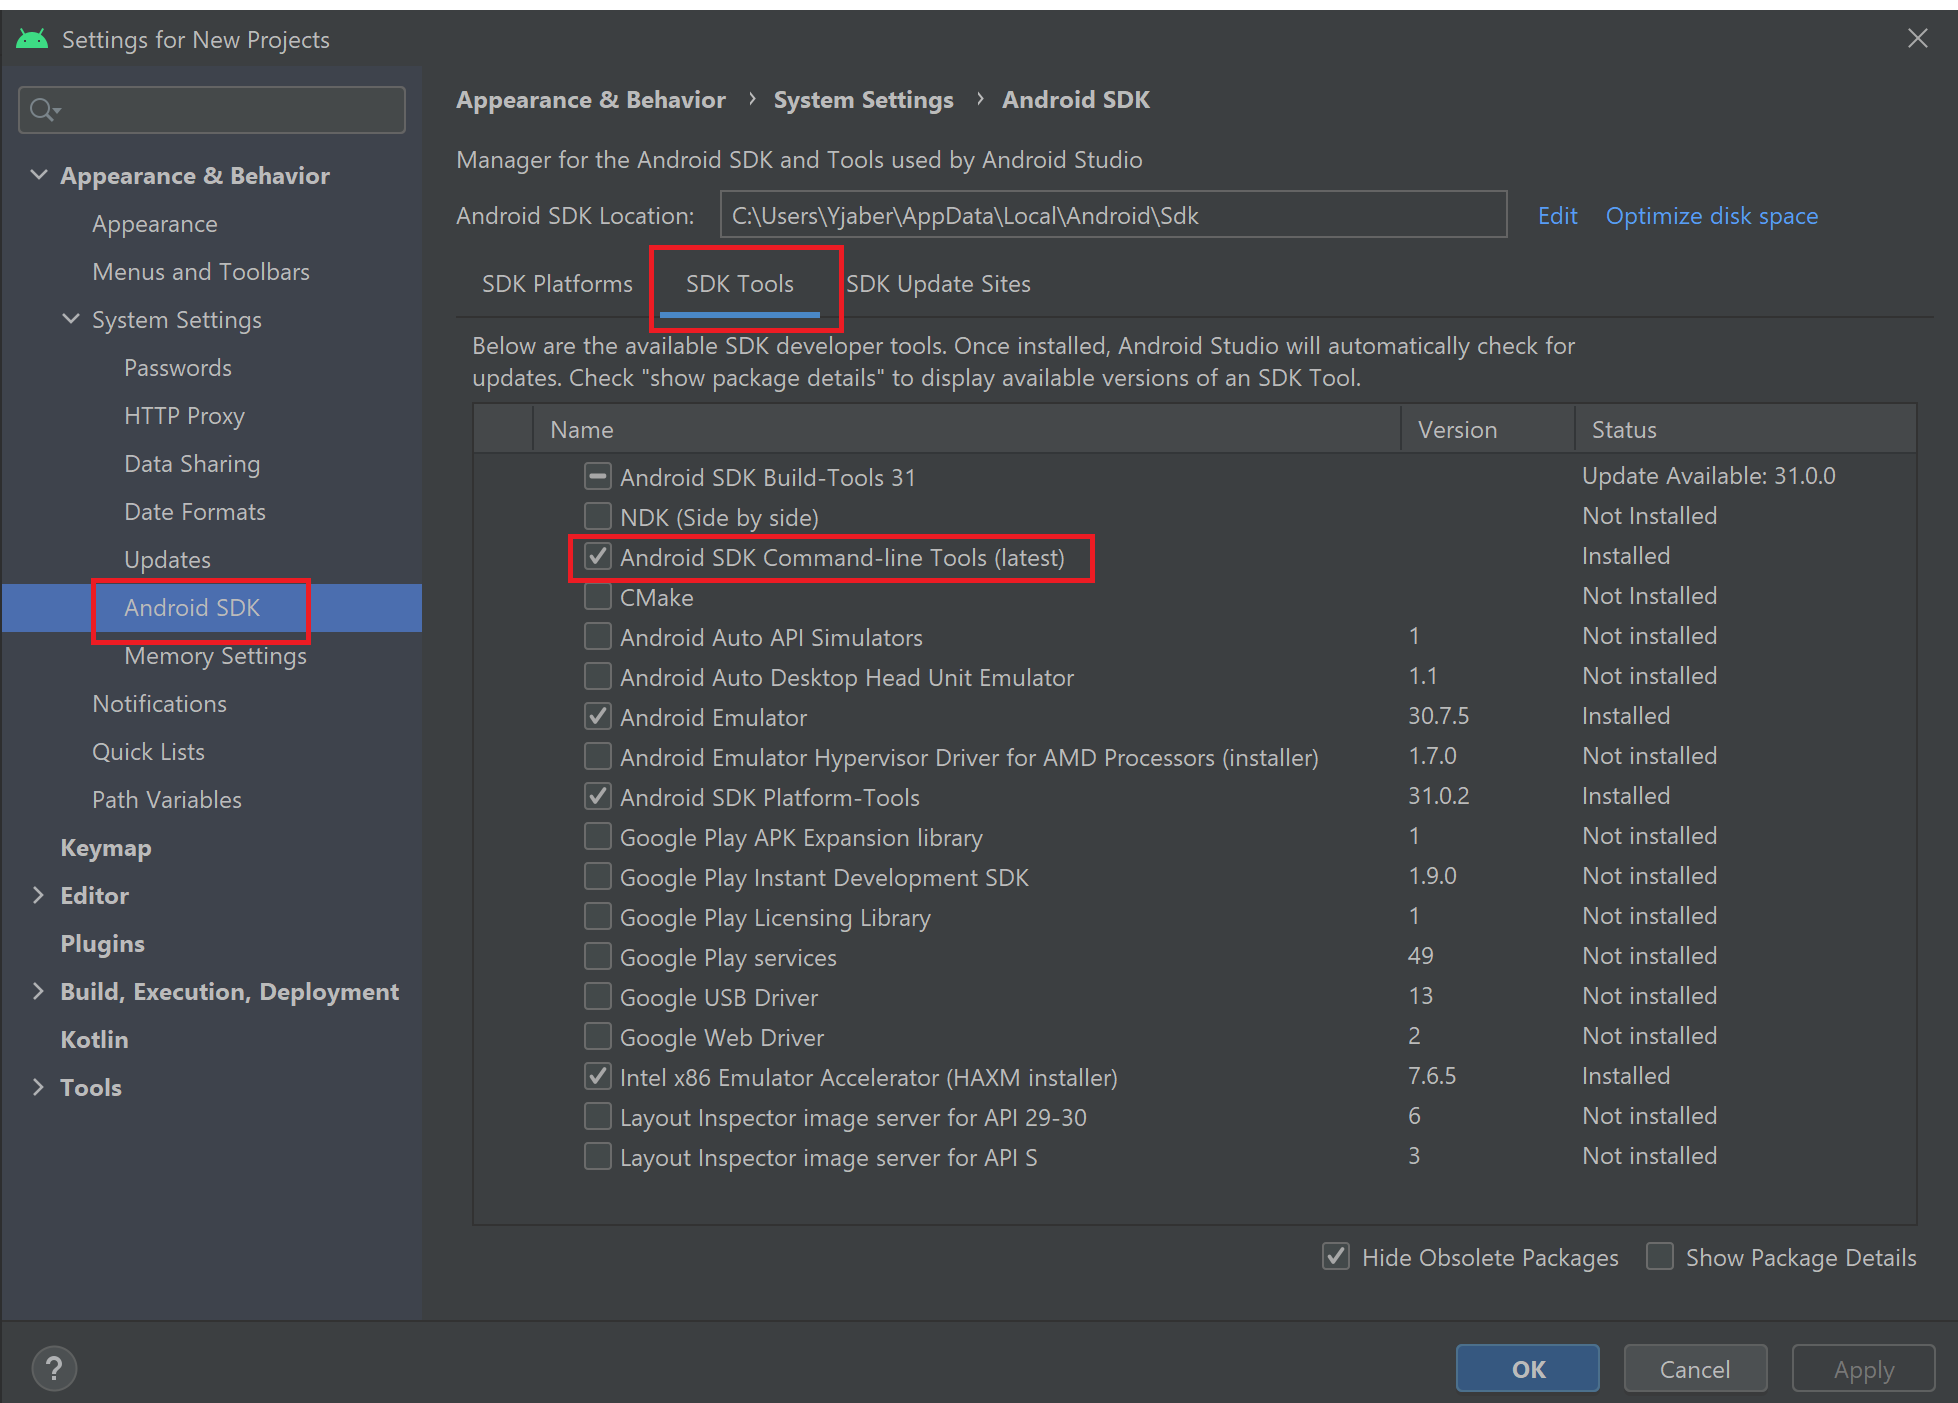
I could successfully fix the issue by simply install install Android SDK command line tool from the Android SDK Manager, in order to do that, follow the below steps

  1. Start Android Studio
  2. Go to Tools > click on SDK Manager
  3. From the left-hand side choose, Appearance & Behavior then System Settings then Android SDK
  4. from the tabs, Select SDK Tools 
  5. Check Android SDK Command-line tools 
  6. click ‘apply’.

Below screenshot is showing the settings popup (I have dark theme on Android Studio)

Android Studio – Settings popup

If you are still facing issues after applying above steps, consider upgrading JDK to the latest. here is the Java official upgrading JDK 8 (latest at this moment)

Microsoft announced the born of new baby; the Windows 365 Cloud PC

Recently Microsoft announced the born of Windows 365 to be early August 2021; It is the Cloud PC version of Windows OS that is dominant over the years. I believe this is will change the whole game in the hybrid working environment

COVID-19 pandemic enforce business to start thinking of the remote working as the best option to overcome the health issues.. Organizations everywhere have transformed themselves through virtual processes and remote collaboration. The ability to work whenever, however, and wherever it’s needed has become the new normal. Everyone want to have working environment that has technologies that’s familiar, easy to use and easy to access. Hybrid working environment becoming the key to success. Microsoft announcing Windows 365; the Cloud Windows version with almost the same experience as Windows 10 or Windows 11. This will be great empowering tool for businesses to move on the Hybrid working model.

Full Windows experience in all devices.. just like what we used to have.

With this great hybrid work paradox, leaving organizations around the world with multiple options to decide how to get connected in a hybrid world and provide the employees with the needed access to organization’s resources from anywhere. All what they need is to have internet connection.

From my point of view; I can tell that the Cloud PC (Windows 365) is a great technology feature that will change the game. Having a secure full version of windows 10/11 experience will enhance and empower the workspace, regardless of the workforce location or devise.

One of the great features is that you can stream all of your personal apps, tools, data and settings from the cloud across virtually all devises including iPad, Mac and android devises.

Familiar tools

I always say, Simplicity is the key to success. Windows 365 have that in hart of the design principles. Microsoft promise us that we can apply the management and security policies to the Cloud PCs in easy way. Also you can monitor the Cloud PC performance and processing power, and easily find the Cloud PC that is not working with best performance needed.

Zero Trust Powering the Cloud security

Per Microsoft, The Cloud PC architecture has been built while keeping in mind the best security practice; Zero Trust architecture, Windows 365 also helps solve for today’s critical security challenges by design, storing and securing information in the cloud, not on the cloud device itself.

Microsoft built Cloud PC specific Security baseline for quick start, you can alter these security policies later on to fit you needs but we wouldn’t recommend doing that without a solid understanding of the side effect turning off these features. Windows Defender is a built-in software into the Windows 365.

The Security baseline provided by Microsoft It not only protects your Cloud PCs, but also gives you security recommendations to lower risks, and helps you quickly find out and troubleshoot any security incidents.

Learn more information about Windows 365

References:
1. https://www.microsoft.com/en-us/microsoft-365/blog/2021/07/14/introducing-a-new-era-of-hybrid-personal-computing-the-windows-365-cloud-pc/

How to Implement Keyboard Shortcuts for your Web Application

In order to increase the user productivity and efficiency while using your web application, you might ended up implementing some sort of keyboard shortcuts. This will enable the end user to use the keyboard to do some actions or to navigate to certain pages without the need to use the mouse.

Implementing keyboard shortcuts in Angular is pretty simple thing. Basically you will need to decorate your Angular event handler method with HostListener attribute.. yes, that’s it. Here is a code sample that will show how to let the user using F10 to save the record

import { Component, HostListener } from '@angular/core';
export class AppComponent {
constructor() {
}

@HostListener('window:keydown.f10', ['$event'])
showPinned(event: KeyboardEvent) {
   event.preventDefault();
   alert('F10 pressed');
   this.save();
}
@HostListener('window:keydown.control.p', ['$event'])
pinRecord(event: KeyboardEvent) {
   event.preventDefault();
   alert('Ctrl+P pressed');
   this.saveRecordIntoHistory();
}
save() {
   //Implement Saving Logic here.
}
saveRecordIntoHistory () {
   //Implement Saving Record into History Logic here.
}
}

References

I built this article based on below references

  1. https://angular.io/api/core/HostListener 
  2. https://developer.mozilla.org/en-US/docs/Web/API/Event/preventDefault