Bridge Design Pattern

Introduction:
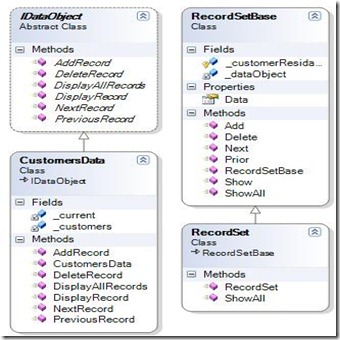
Sometimes you want to decouple the abstraction from its implementation so both of them can be vary independently. Bridge design pattern helps you in implementing this decoupling easily. The bridge uses encapsulation, aggregation, and can use inheritance to separate responsibilities into different classes
Example:

BridgeDesignPattern


static void Main()
{
// Create Record Set Manager
RecordSet customers = new RecordSet(“Jordan”);
// Set ConcreteImplementor which is in this case is Customer Data.
customers.Data = new CustomersData();
// Exercise the bridge
customers.Show();
customers.Next();
customers.Show();
customers.Next();
customers.Show();
customers.Add(“New Customer”);
customers.ShowAll();
// Exit
Console.ReadKey();
}
class RecordSet : RecordSetBase
{
// Constructor
public RecordSet(string CustomerResidancyGroup)
: base(CustomerResidancyGroup)
{
}
public override void ShowAll()
{
Console.WriteLine();
Console.WriteLine(“************************”);
base.ShowAll();
Console.WriteLine(“************************”);
}
}
class RecordSetBase
{
private IDataObject _dataObject;
protected string _customerResidancyGroup;
public RecordSetBase(string customerResidancyGroup)
{
this._customerResidancyGroup = customerResidancyGroup;
}
// Property
public IDataObject Data
{
set { _dataObject = value; }
get { return _dataObject; }
}
public virtual void Next()
{
_dataObject.NextRecord();
}
public virtual void Prior()
{
_dataObject.PreviousRecord();
}
public virtual void Add(string customer)
{
_dataObject.AddRecord(customer);
}
public virtual void Delete(string customer)
{
_dataObject.DeleteRecord(customer);
}
public virtual void Show()
{
_dataObject.DisplayRecord();
}
public virtual void ShowAll()
{
Console.WriteLine(“Customer Group: ” + _customerResidancyGroup);
_dataObject.DisplayAllRecords();
}
}
class CustomersData : IDataObject
{
private List<string> _customers = new List<string>();
private int _current = 0;
public CustomersData()
{
// Loaded from a database
_customers.Add(“Customer 1”);
_customers.Add(“Customer 2”);
_customers.Add(“Customer 3”);
_customers.Add(“Customer 4”);
_customers.Add(“Customer 5″);
}
public void NextRecord()
{
if (_current <= _customers.Count – 1)
{
_current++;
}
}
public void PreviousRecord()
{
if (_current > 0)
{
_current–;
}
}
public void AddRecord(string customer)
{
_customers.Add(customer);
}
public void DeleteRecord(string customer)
{
_customers.Remove(customer);
}
public void DisplayRecord()
{
Console.WriteLine(_customers[_current]);
}
public void DisplayAllRecords()
{
foreach (string customer in _customers)
{
Console.WriteLine(” ” + customer);
}
}
}
interface IDataObject
{
void NextRecord();
void PreviousRecord();
void AddRecord(string name);
void DeleteRecord(string name);
void DisplayRecord();
void DisplayAllRecords();
}


Download Code

Abstract Factory Design Pattern

Introduction:

Sometimes you want to create an instance of class that is related to a family of classes without specifying the exact concert class. Factory design pattern came to solve this issue and make it easy for us.

In order to avoid duplicating the code that make the decision everywhere an instance is created, we need a mechanism for creating instances of related classes without necessarily knowing which will be instantiated.

There are 2 types of Factory Design Pattern:

  1. Simple Factory: the result of the Factory method is a subclass (inherited class) of the Abstract Class. The choice of which subclass to instantiate is completely defined by which method is used, and is unknown to the client.
  2. Abstract Factory: an abstract class defining a common protocol of Factory methods. Concrete subclasses of the abstract factory implement this protocol to answer instances of the appropriate suite of classes.

Example:

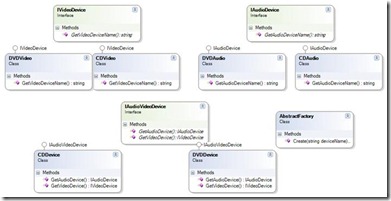
Suppose we have 2 Audio/Video devices (CD & DVD ). Both devices has audio and video features but those devices does not have the same shared parent class. And we need to simplify the creational of objects. The best solution for this is to go with abstract factory design pattern. Below is the diagram illustrating how we can design classes to serve the main purpose.

Interfaces:

  • IVideoDevice: is the interface that all Video classes inherits.
  • IAudioDevice: is the interface that all Audio classes inherits.
  • IAudioVideoDevice: is the interface that all Audio/Video classes inherits.

Classes:

  • CDAudio: Inherits from IAudioDevice and implement the needed methods.
  • CDVideo: Inherits from IVideoDevice and implement the needed methods.
  • CDDevice: Inherits from IAudioVideoDevice and create the correct Audio/Video devices.
  • DVDAuio: Inherits from IAudioDevice and implement the needed methods.
  • DVDVideo: Inherits from IVideoDevice and implement the needed methods.
  • DVDDevice: Inherits from IAudioVideoDevice and create the correct Audio/Video devices.
  • AbstractFactory: Is responsible of creating the correct Audio/Video objects according to a string parameter passed to it( this might be changed to enum or something like that)

FactoryDesignPattern

static void Main(string[] args)
{
string deviceName;
deviceName = Console.ReadLine();
IAudioVideoDevice device = AbstractFactory.Create(deviceName);
Console.WriteLine(device.GetAudioDevice().GetAudioDeviceName());
Console.WriteLine(device.GetVideoDevice().GetVideoDeviceName());
Console.ReadKey();
}
class AbstractFactory
{
public static IAudioVideoDevice Create( string deviceName)
{
switch (deviceName.ToLower())
{
case “CD”:
return new  CDDevice();
case “dvd”:
return new DVDDevice();
default:
return new CDDevice();
}
}
}
class DVDDevice:IAudioVideoDevice
{
#region IAudioVideoDevice Members
public IAudioDevice GetAudioDevice()
{
return new DVDAudio();
}
public IVideoDevice GetVideoDevice()
{
return new DVDVideo();
}
#endregion
}
class CDDevice:IAudioVideoDevice
{
#region IAudioVideoDevice Members
public IAudioDevice GetAudioDevice()
{
return new CDAudio();
}
public IVideoDevice GetVideoDevice()
{
return new CDVideo();
}
#endregion
}
class CDAudio:IAudioDevice
{
#region IAudioDevice Members
public string GetAudioDeviceName()
{
return “CD Audio”;
}
#endregion
}
class CDVideo:IVideoDevice
{
#region IVideoDevice Members
public string GetVideoDeviceName()
{
return “CD Video”;
}
#endregion
}
class DVDAudio:IAudioDevice
{
#region IAudioDevice Members
public string GetAudioDeviceName()
{
return “DVD Audio”;
}
#endregion
}
class DVDVideo:IVideoDevice
{
#region IVideoDevice Members
public string GetVideoDeviceName()
{
return “DVD Video”;
}
#endregion
}
interface IAudioVideoDevice
{
IAudioDevice GetAudioDevice();
IVideoDevice GetVideoDevice();
}
interface IAudioDevice
{
string GetAudioDeviceName();
}
interface IVideoDevice
{
string GetVideoDeviceName();
}

Download Code

Prototype Design Pattern

Introduction:
Sometimes we have a case where we want to build an object based on another object instead of creating a new fresh object each time, we can make a copy of an already existing object instantly and start using the new created object. By doing so, we do not have to repeat the building process each time. The newly created object will be independent from the old one.
We can use the Prototype Design Pattern to solve this issue.
Example:
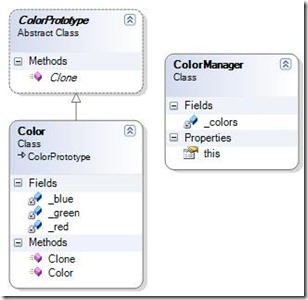
On the following example we will create couple of color objects then Cline those objects into new instances.

PrototypeDesignPattern


abstract class ColorPrototype
{
public abstract ColorPrototype Clone();
}

class ColorManager
{
private Dictionary<string, ColorPrototype> _colors = new Dictionary<string, ColorPrototype>();
// Indexer
public ColorPrototype this[string key]
{
get { return _colors[key]; }
set { _colors.Add(key, value); }
}
}

class Color : ColorPrototype
{
private int _red;
private int _green;
private int _blue;
// Constructor
public Color(int red, int green, int blue)
{
this._red = red;
this._green = green;
this._blue = blue;
}
// Create a shallow copy
public override ColorPrototype Clone()
{
Console.WriteLine(
“Cloning color RGB: ” + _red.ToString() + ” , ” +
_green.ToString() + ” , ” + _blue.ToString());
return this.MemberwiseClone() as ColorPrototype;
}
}

static void Main(string[] args)
{
ColorManager colormanager = new ColorManager();
// Initialize with standard colors
colormanager[“RED”] = new Color(255, 0, 0);
colormanager[“GREEN”] = new Color(0, 255, 0);
colormanager[“BLUE”] = new Color(0, 0, 255);
// User adds personalized colors
colormanager[“ANGRY”] = new Color(255, 12, 0);
colormanager[“PEACE”] = new Color(128, 200, 128);
colormanager[“FLAME”] = new Color(211, 150, 20);
// User clones selected colors
Color color1 = colormanager[“RED”].Clone() as Color;
Color color2 = colormanager[“PEACE”].Clone() as Co  lor;
Color color3 = colormanager[“FLAME”].Clone() as Color;
// Wait for user
Console.ReadKey();
}

Download Code

Singleton Design Pattern

Introduction:
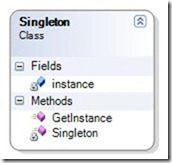
There is some cases when you want to have one and only one instance of a specific class and prevent anybody from having the ability to create more than one instance of that class. Singleton Design pattern came to solve this issue by defining a well known structure for your class


Singleton1

Example:
Singleton Design pattern can be used in Data repository or data collection where creation of more than one instance of this class can be resource wastage… Hence each client to singleton class is referencing to the same single shared object. Which will solve the issue.

Singleton2

public class Singleton
{
private static Singleton instance;
private static int numOfReference;
private static int numOfInstances = 0;
private string code;
private Singleton()
{
numOfReference = 0;
numOfInstances++;
code = “Code ” + numOfInstances.ToString();
}
//Return instance of the Singleton class
public static Singleton GetInstance()
{
if(instance == null)
{
instance = new Singleton();
}
numOfReference++;
return instance;
}
public static int ReferenceCounter
{
get { return numOfReference; }
}
public static int InstanceCounter
{
get { return numOfInstances; }
}
public string Code
{
get { return code; }
set { code = value;}
}
}
static void Main(string[] args)
{
Singleton instance1 = Singleton.GetInstance();
Console.WriteLine(“No. of references : ” + Singleton.ReferenceCounter);  // should be 1
Console.WriteLine(“First Objects code: ” + instance1.Code);
Console.WriteLine(“Instances Counter: ” + Singleton.InstanceCounter);   // should be 1
Singleton instance2 = Singleton.GetInstance();
Console.WriteLine(“No. of references : ” + Singleton.ReferenceCounter);  // should be 2
Console.WriteLine(“Second Objects code: ” + instance2.Code);
Console.WriteLine(“Instances Counter: ” + Singleton.InstanceCounter);   // should be 1
}

Adapter Design Pattern

Introduction:
Sometimes you have set of classes with different interfaces and you want to call logic on those classes in a consistent way. Adapter design pattern solve this issue, by providing a technique (best practice)  to wrap those classes somehow to make it easy to deal with this set of classes. Also Adapter is responsible of data transformation between heterogeneous interfaces .
The main benefits from Adapter Design pattern is letting classes work together that could not otherwise because of incompatible interfaces.

Example:
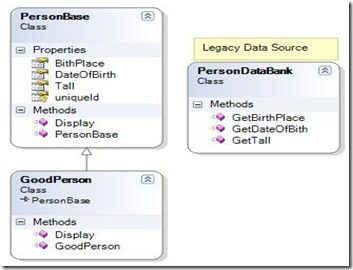
AdapterDesignPattern

class Program
{
static void Main(string[] args)
{
PersonBase p1 = new GoodPerson(“111111”);
PersonBase p2 = new GoodPerson(“222222”);
PersonBase p3 = new GoodPerson(“333333”);
p1.Display();
p2.Display();
p3.Display();
Console.ReadKey();
}
}
class PersonDataBank
{
//Lagecy APIs
public float GetTall(string  uniqueId)
{
switch (uniqueId)
{
case “111111”:
return 100f;
case “222222”:
return 102f;
case “333333”:
return 103f;
default:
return 150f;
}
}
public DateTime GetDateOfBith(string uniqueId)
{
switch (uniqueId)
{
case “111111”:
return DateTime.Parse(“1/1/2000”); ;
case “222222”:
return DateTime.Parse(“1/1/2001”); ;
case “333333”:
return DateTime.Parse(“1/1/2002”); ;
default:
return DateTime.Parse(“1/1/2003”); ;
}
}
public string GetBirthPlace(string uniqueId)
{
switch (uniqueId)
{
case “111111”:
return “USA,Los Angeles”;
case “222222”:
return “USA,SD”;
case “333333”:
return “USA,LV”;
default:
return “USA,WA”;
}
}
}
class PersonBase
{
public float Tall {get;set;}
public DateTime DateOfBirth {get;set;}
public string BithPlace {get;set;}
protected string uniqueId { get; set; }
public PersonBase(string uniqueId)
{
this.uniqueId = uniqueId;
}
public virtual void Display()
{
Console.WriteLine(“\nPerson: {0} “, this.uniqueId);
}
}
class GoodPerson: PersonBase
{
public GoodPerson(string uniqueId) :base(uniqueId)
{
}
public override void Display()
{
PersonDataBank bank = new PersonDataBank();
base.DateOfBirth = bank.GetDateOfBith(base.uniqueId);
base.BithPlace = bank.GetBirthPlace(base.uniqueId);
base.Tall = bank.GetTall(base.uniqueId);
base.Display();
Console.WriteLine(” DOB: {0}”, DateOfBirth);
Console.WriteLine(” Birth Place : {0}”, BithPlace);
Console.WriteLine(” Tall: {0}”, Tall);
Console.WriteLine(“=====================”);
}
}

Download Code

Builder Design Pattern

Introduction:
Sometimes you need to build your Classes in such away where its representation is different according to some attributes and this representation of this class needs to be separated from its construction. Builder Design pattern solve this issue by abstract complex object construction from its representation.

Example:
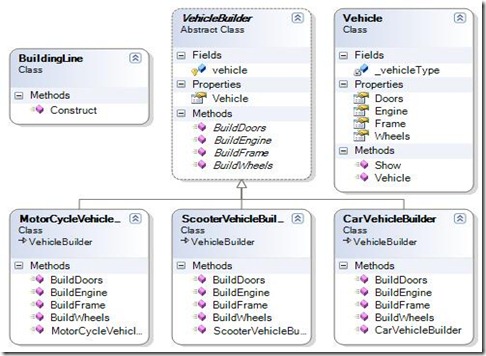
An example of Builder Design pattern is how to assemble vehicles in a step by step way. we can use Vehicle builder to construct the representation of vehicles in a step by step way. this vehicle might be car, truck or even a bicycle. the below code snap shows how to utilize Builder design pattern to construct the different type of vehicles.BuilderDesignPattern


static void Main(string[] args)
{
VehicleBuilder builder;

// Create BuildingLine with vehicle builders
BuildingLine buildingLine = new BuildingLine();

// Construct and display vehicles
builder = new ScooterVehicleBuilder();
buildingLine.Construct(builder);
builder.Vehicle.Show();

builder = new CarVehicleBuilder();
buildingLine.Construct(builder);
builder.Vehicle.Show();

builder = new MotorCycleVehicleBuilder();
buildingLine.Construct(builder);
builder.Vehicle.Show();

// Wait for user
Console.ReadKey();
}

class BuildingLine
{
// Builder uses a complex series of steps
public void Construct(VehicleBuilder vehicleBuilder)
{
vehicleBuilder.BuildFrame();
vehicleBuilder.BuildEngine();
vehicleBuilder.BuildWheels();
vehicleBuilder.BuildDoors();
}
}

class CarVehicleBuilder : VehicleBuilder
{
public CarVehicleBuilder()
{
vehicle = new Vehicle(“Car Vehicle”);
}

public override void BuildFrame()
{
vehicle.Frame = “Car Vehicle Frame”;
}

public override void BuildEngine()
{
vehicle.Engine = “3000 CC capicity”;
}

public override void BuildWheels()
{
vehicle.Wheels  = 4;
}

public override void BuildDoors()
{
vehicle.Doors = “4”;
}
}

class MotorCycleVehicleBuilder : VehicleBuilder
{
public MotorCycleVehicleBuilder()
{
vehicle = new Vehicle(“MotorCycle Vehicle”);
}

public override void BuildFrame()
{
vehicle.Frame =  “MotorCycle Vehicle Frame”;
}

public override void BuildEngine()
{
vehicle.Engine =  “300 CC Capacity”;
}

public override void BuildWheels()
{
vehicle.Wheels =  2;
}

public override void BuildDoors()
{
vehicle.Doors =  “0”;
}
}

class ScooterVehicleBuilder : VehicleBuilder
{
public ScooterVehicleBuilder()
{
vehicle = new Vehicle(“Scooter Vehicle”);
}

public override void BuildFrame()
{
vehicle.Frame = “Scooter Vehicle Frame”;
}

public override void BuildEngine()
{
vehicle.Engine = “50 CC Capacity”;
}

public override void BuildWheels()
{
vehicle.Wheels  = 2;
}

public override void BuildDoors()
{
vehicle.Doors = “0”;
}
}

class Vehicle
{

private string _vehicleType;

// Constructor
public Vehicle(string vehicleType)
{
this._vehicleType = vehicleType;
}

public string Frame { get; set; }
public string Engine { get; set; }
public int Wheels { get; set; }
public string Doors { get; set; }

public void Show()
{
Console.WriteLine(“\n—————————“);
Console.WriteLine(“Vehicle Type: {0}”, _vehicleType);
Console.WriteLine(” Frame : {0}”, this.Frame);
Console.WriteLine(” Engine : {0}”, this.Engine);
Console.WriteLine(” #Wheels: {0}”, this.Wheels);
Console.WriteLine(” #Doors : {0}”, this.Doors);
}

}

abstract class VehicleBuilder
{
protected Vehicle vehicle;

// Gets vehicle instance
public Vehicle Vehicle
{
get { return vehicle; }
}

// Abstract build methods
public abstract void BuildFrame();
public abstract void BuildEngine();
public abstract void BuildWheels();
public abstract void BuildDoors();
}

Decorator Design Pattern

Introduction:
Sometimes you want to add more responsibility to an object dynamically. Decorate Design Pattern provide us a flexible alternative to creating subclasses to extend this functionality. So you will not have to extend functionality by creating a child (Sub class) class.
Example:

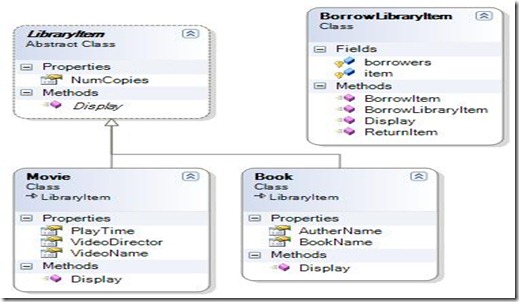
DecoratorDesignPattern

class Program
{
static void Main()
{
Book b = new Book();
b.BookName = “Book Name”;
b.AutherName = “Auther Name”;
b.NumCopies = 10;
b.Display();
Movie v = new Movie();
v.VideoName = “Some Video name”;
v.VideoDirector = ” a Director”;
v.PlayTime = “1 hour”;
v.NumCopies = 10;
v.Display();
Console.WriteLine(“———————-“);
Console.WriteLine(“Borrow the book”);
BorrowLibraryItem borrow = new BorrowLibraryItem(b);
borrow.BorrowItem(“Yasser Jaber”);
borrow.BorrowItem(“Salah Jaber”);
borrow.Display();
Console.ReadKey();
}
}
abstract class LibraryItem
{
public int NumCopies{get;set;}
public abstract void Display();
}
class Book:LibraryItem
{
public string BookName { get; set; }
public string AutherName { get; set; }
public override void Display()
{
Console.WriteLine();
Console.WriteLine(“–> Book : “);
Console.WriteLine(” Author: {0}”, this.AutherName);
Console.WriteLine(” Book Name: {0}”, this.BookName);
Console.WriteLine(” Number of Copies: {0}”, base.NumCopies);
}
}
class Movie: LibraryItem
{
public string VideoDirector { get; set; }
public string VideoName { get; set; }
public string PlayTime { get; set; }
public override void Display()
{
Console.WriteLine( );
Console.WriteLine(“–>Movie : “);
Console.WriteLine(” Director: {0}”, VideoDirector);
Console.WriteLine(” Name: {0}”, VideoName);
Console.WriteLine(” Number of Copies: {0}”, NumCopies);
Console.WriteLine(” Playtime: {0}”, PlayTime);
}
}
class BorrowLibraryItem
{
protected List<string> borrowers = new List<string>();
protected LibraryItem item;
public BorrowLibraryItem(LibraryItem item)
{
this.item = item;
}
public void BorrowItem(string borrowerName)
{
borrowers.Add(borrowerName);
item.NumCopies–;
}
public void ReturnItem(string borrowerName)
{
borrowers.Remove(borrowerName);
item.NumCopies++;
}
public void Display()
{
item.Display();
Console.WriteLine();
Console.WriteLine(“Borrowers:”);
for (int i = 1; i <= borrowers.Count; i++)
{
Console.WriteLine(i.ToString() + “. ” + borrowers[i – 1]);
}
}
}


Download Code

Strategy Design Pattern

Introduction:
Sometimes you want your object to behave differently if its internal status changed. The strategy Design pattern enables client code to choose which behavior from a family of behaviors and give client code a simple way to enable that behavior.
Example:

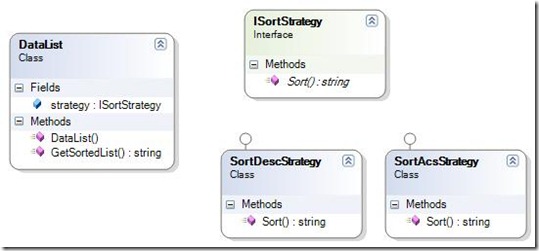
Strategy


interface ISortStrategy
{
string Sort();
}

public string Sort()
{
return “0 1 2 3 4 5 6 7 8 9 “; //Simulate sorting algorithm
}

public string Sort()
{
return “9 8 7 6 5 4 3 2 1 0”; //Simulate sorting algorithm
}

class DataList
{
public ISortStrategy strategy;
public DataList(ISortStrategy strategy)
{
this.strategy = strategy;
}
public string GetSortedList()
{
return strategy.Sort();
}
}
static void Main()
{
DataList data = new DataList(new SortAcsStrategy());
Console.WriteLine(data.GetSortedList());
data.strategy = new SortDescStrategy();
Console.WriteLine(data.GetSortedList());
Console.ReadKey();
}


Download Code