Introduction to SignalR

signalr

What is ASP.Net SignalR

SignalR is a Technology that enable Real-Time messages/contents to be pushed from server to connected web clients without the need to refresh the web pages every specific period of time. In the old days, we used to have schedule timer on client side to request new data from server every specific period of time to update client UI with the new data. with SignalR this is no more the case.

Microsoft published a specific library for developers to enable them to add real-time functionlaities to asp.net web application . It is worth to mention here that SignalR is an open source project  an you can check the source code on GitHub.

Also SignalR supporting Scale out to thousands of clients using Service Bus, SQL Server or Redis. This enable SignalR to work seamlessly in  Web Farm or Web Garden environments with no issues to mention.

SignalR Usage Examples:

Chat applications over web is a great example of the usage of SignalR, Auto update client screens with currency exchange rates where user will get live updates with currency exchange rates as it is got changed

SignalR Communication Models:

There is 2 ways of communication models between Server and Clients using SignalR; Persistent Connections and Hubs

1. Persistent Connections:  A Connection represents a simple endpoint for sending single-recipient, or broadcast messages. The Persistent Connection enables the developer to have a direct access to the low-level communication protocol that SignalR exposes.
for those who worked with connection-based APIs in Windows Communication Foundation WCF, will be easily getting familiar with this model.
2. Hubs: is a more high-level that is built on top of connection API and allow server and clients to be able to call methods on each other directly and seamlessly. It is SignalR responsibility to handles the dispatching messages over the internet; SignalR MAGIC!
For those who use Remote Invocation APIs such as .NET Remoting will be getting familair with this model easily.

The Hub Communication model is suitable for most of the applications needs. For me I never get into a case where I have to use Persistent connection model, and I always go to Hubs model.

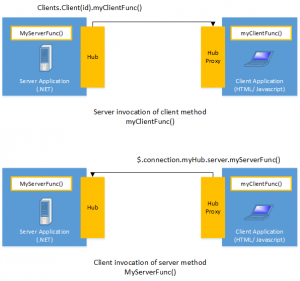
One of the Diagram that make it easy to understand the SignalR magic that I copied from www.asp.net site is the below one.. where it is showing that client can call server method easily and server can call a method on web client with no issues. This wasn’t possible without SignalR

what_is_signalr_invocation


SOLID Object-Oriented-Design Principles

One of the main principles of OOD (Object Oriented Design) is SOLID principles. SOLID is stands for :

1. Single Responsibility Principle:

This means the class has to have one and only one reason to responsibility. This responsibility should be encapsulated by the class.

2. Open/closed principle:

The open/closed principle states that software entities (classes, modules, functions, …etc) should be open for extension, but not for (closed) modification

This will be very helpful on the production environment where fixing and enhancing certain area is required without affecting other areas. thus you will go with extending the class and its behaviors without modifying the current existing code/methods

3. Liskov substitution principle:

means Substitute-ability; It states that, if SubclassA is a sub-type of MainTypeA, then objects of type MainTypeA may be replaced with objects of type SubclassA without altering any of the properties of that program

4. Interface segregation principle:

The main goal from this point is to make the software more maintainable and loosely coupled; thus easier to re-factor and change. Basically, we need to split the large interfaces into smaller interfaces so that the client classes will be aware of the methods/properties they concern about

5. Dependency inversion principle:

It is about decoupling software layers and making sure the software is loosely coupled. Basically this principle states 2 things:

– High-level modules/layers should NOT depend on low-level modules/layers. communication between modules and layers should go through abstractions.

– Abstractions should NOT depend on details and the Details should depend on abstractions.


State Design Pattern

Introduction:
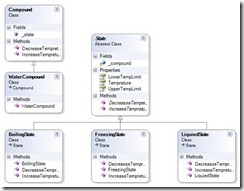
Sometimes you want to build a class where its behavior changed according to its state. State Design pattern provides a good class structure to solve this issue. State Design pattern also known as Object for state pattern is used to represent the state of an object and the object behavior will changed according to state changes.
Example:

StateDesignPattern


static void Main(string[] args)
{
WaterCompound c = new WaterCompound(0);
c.IncreaseTempreture(10);
c.IncreaseTempreture(100);
c.DecreaseTempreture(99);
c.DecreaseTempreture(40);
c.DecreaseTempreture(50);
Console.ReadKey();
}
class WaterCompound : Compound
{
public WaterCompound(int temp)
{
_state = new LiquiedState(this,temp,0,100);
}
}
public class Compound
{
public State _state;
public void IncreaseTempreture(int temp)
{
_state.IncreaseTempreture(temp);
Console.WriteLine(” Balance = {0:D}”, _state.Tempreture);
Console.WriteLine(” Status = {0}\n”,
this._state.GetType().Name);
Console.WriteLine(“—————-“);
}
public void DecreaseTempreture(int temp)
{
_state.DecreasseTempreture(temp);
Console.WriteLine(” Balance = {0:D}”, _state.Tempreture);
Console.WriteLine(” Status = {0}\n”,
this._state.GetType().Name);
Console.WriteLine(“—————-“);
}
}
public abstract class State
{
protected Compound _compound;
public int LowerTempLimit { get; set; }
public int UpperTempLimit { get; set; }
public int Tempreture { get; set; }
public abstract void IncreaseTempreture(int temp);
public abstract void DecreasseTempreture(int temp);
}
class BoilingState:State
{
public BoilingState(Compound c,int temp,int lowerTemp,int Uppertemp)
{
Tempreture = temp;
base._compound = c;
LowerTempLimit = lowerTemp;
UpperTempLimit = Uppertemp;
}
public override void IncreaseTempreture(int temp)
{
Tempreture += temp;
}
public override void DecreasseTempreture(int temp)
{
Tempreture -= temp;
if (Tempreture < LowerTempLimit)
base._compound._state = new LiquiedState(_compound, Tempreture,0,100);
}
}
class FreezingState:State
{
public FreezingState(Compound c,int temp,int lowerTemp,int Uppertemp)
{
Tempreture = temp;
base._compound = c;
LowerTempLimit = lowerTemp;
UpperTempLimit = Uppertemp;
}
public override void IncreaseTempreture(int temp)
{
Tempreture += temp;
if (Tempreture > UpperTempLimit)
_compound._state = new LiquiedState(_compound, Tempreture,0,100);
}
public override void DecreasseTempreture(int temp)
{
Tempreture -= temp;
}
}
class LiquiedState:State
{
public LiquiedState(Compound c,int temp,int lowerTemp,int Uppertemp)
{
Tempreture = temp;
base._compound = c;
LowerTempLimit = lowerTemp;
UpperTempLimit = Uppertemp;
}
public override void IncreaseTempreture(int temp)
{
Tempreture += temp;
if (Tempreture > UpperTempLimit)
_compound._state = new BoilingState(_compound, Tempreture,101,100000);
}
public override void DecreasseTempreture(int temp)
{
Tempreture -= temp;
if (Tempreture < LowerTempLimit)
_compound._stae = new FreezingState(_compound, Tempreture,-150,-1);
}
}

Download Code

Command Design Pattern

Introduction:
Command Design Pattern enables you to encapsulate a request as an object, thereby letting you parameterize clients with different requests, queue or log requests, and support undoable operations.
Example:
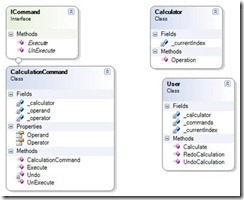
The below code demonstrates the Command pattern to be used on a simple calculator. This caluclator doing unlimited number of undo’s & Redo’s .

One thing we might do to extend this Calculator project, is to create an IOperator Interface and for each operation have a concret Operator Class. for simplicity I am not going to do this. I will hard code couple of operator to make it very simple to be understood.


CommandDesignPattern


static void Main()
{
// Create user and let her compute
User user = new User();
// User presses calculator buttons
user.Calculate(‘+’, 100);
user.Calculate(‘-‘, 50);
user.Calculate(‘*’, 10);
user.Calculate(‘/’, 2);
// Undo 4 commands
user.UndoCalculation(4);
// Redo 3 commands
user.RedoCalculation(3);
// Wait for user
Console.ReadKey();
}
interface ICommand
{
void Execute();
void UnExecute();
}
class CalculationCommand : ICommand
{
private char _operator;
private int _operand;
private Calculator _calculator;
// Constructor
public CalculationCommand(Calculator calculator,
char @operator, int operand)
{
this._calculator = calculator;
this._operator = @operator;
this._operand = operand;
}
// Gets operator
public char Operator
{
set { _operator = value; }
}
// Get operand
public int Operand
{
set { _operand = value; }
}
// Execute new command
public  void Execute()
{
_calculator.Operation(_operator, _operand);
}
// Unexecute last command
public  void UnExecute()
{
_calculator.Operation(Undo(_operator), _operand);
}
// Returns opposite operator for given operator
private char Undo(char @operator)
{
switch (@operator)
{
case ‘+’: return ‘-‘;
case ‘-‘: return ‘+’;
case ‘*’: return ‘/’;
case ‘/’: return ‘*’;
default: throw new
ArgumentException(“@operator”);
}
}
}
class Calculator
{
private int _currentIndex = 0;
public void Operation(char @operator, int operand)
{
switch (@operator)
{
case ‘+’: _currentIndex += operand; break;
case ‘-‘: _currentIndex -= operand; break;
case ‘*’: _currentIndex *= operand; break;
case ‘/’: _currentIndex /= operand; break;
}
Console.WriteLine(
“Current value = {0,3} (following {1} {2})”,
_currentIndex, @operator, operand);
}
}
class User
{
// Initializers
private Calculator _calculator = new Calculator();
private List<ICommand> _commands = new List<ICommand>();
private int _currentIndex = 0;
public void RedoCalculation(int levels)
{
Console.WriteLine(“\n—- Redo {0} levels “, levels);
// Perform redo operations
for (int i = 0; i < levels; i++)
{
if (_currentIndex < _commands.Count – 1)
{
ICommand command = _commands[_currentIndex++];
command.Execute();
}
}
}
public void UndoCalculation(int levels)
{
Console.WriteLine(“\n—- Undo {0} levels “, levels);
// Perform undo operations
for (int i = 0; i < levels; i++)
{
if (_currentIndex > 0)
{
ICommand command = _commands[–_currentIndex] as ICommand;
command.UnExecute();
}
}
}
public void Calculate(char @operator, int operand)
{
// Create command operation and execute it
ICommand command = new CalculationCommand(
_calculator, @operator, operand);
command.Execute();
// Add command to undo list
_commands.Add(command);
_currentIndex++;
}
}

Download Code

Iterator Design Pattern

Introduction:
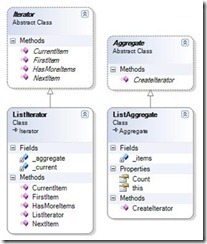
Sometimes you want to access a collection of objects in a sequential way without even expose how things is going inside your implementation . Iterator Design Pattern Provides you with a Skelton of how to design your classes to solve this issue.
Example:

IteratorDesignPattern

static void Main(string[] args)
{
ListAggregate a = new ListAggregate();
a[0] = “Item A”;
a[1] = “Item B”;
a[2] = “Item C”;
a[3] = “Item D”;
// Create Iterator and provide aggregate
ListIterator i = new ListIterator(a);
Console.WriteLine(“Iterating over collection:”);
string item = i.FirstItem();
while (item != null)
{
Console.WriteLine(item);
item = i.NextItem();
}
// Wait for user
Console.ReadKey();
}
class ListIterator : Iterator
{
private ListAggregate _aggregate;
private int _current = 0;
// Constructor
public ListIterator(ListAggregate aggregate)
{
this._aggregate = aggregate;
}
// Gets first iteration item
public override string FirstItem()
{
return (string)_aggregate[0];
}
// Gets next iteration item
public override string NextItem()
{
string ret = null;
if (_current < _aggregate.Count – 1)
{
ret = (string)_aggregate[++_current];
}
return ret;
}
// Gets current iteration item
public override string CurrentItem()
{
return (string)_aggregate[_current];
}
// Gets whether iterations are complete
public override bool HasMoreItems()
{
return _current >= _aggregate.Count;
}
}
class ListAggregate : Aggregate
{
private ArrayList _items = new ArrayList();
public override Iterator CreateIterator()
{
return new ListIterator(this);
}
// Gets item count
public int Count
{
get { return _items.Count; }
}
// Indexer
public string this[int index]
{
get { return (string)_items[index]; }
set { _items.Insert(index, value); }
}
}
abstract class Iterator
{
public abstract string FirstItem();
public abstract string NextItem();
public abstract bool HasMoreItems();
public abstract string CurrentItem();
}
abstract class Aggregate
{
public abstract Iterator CreateIterator();
}

Download Code

Mediator Design Pattern

Introduction:
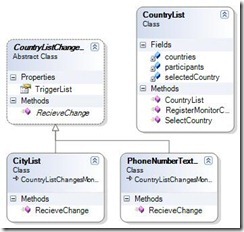
Sometimes you want to design your classes set that interact with each other in a loosely coupled manner by keeping your classes away from referring each other directly… Mediator Design Pattern solve this issue by promoting the idea of loosely coupling classes

Example:

MediatorDesignPattern


static void Main(string[] args)
{
CountryList countrylist = new CountryList();

CityList city = new CityList();
PhoneNumberTextBox phone = new PhoneNumberTextBox();

countrylist.RegisterMonitorChangers(city);
countrylist.RegisterMonitorChangers(phone);

Console.WriteLine(“——————-“);
countrylist.SelectCountry(“USA”);
Console.WriteLine(“——————-“);
countrylist.SelectCountry(“Jordan”);

Console.ReadKey();

}

abstract class CountryListChangesMonitorBase
{
public CountryList TriggerList { get; set; }

public abstract void RecieveChange(string countryName);
}

class CountryList
{
List<string> countries = new List<string>();
string selectedCountry = “”;

List<CountryListChangesMonitorBase> participants = new List<CountryListChangesMonitorBase>();

public CountryList()
{
countries.Add(“USA”);
countries.Add(“UK”);
countries.Add(“Jordan”);
countries.Add(“Jaban”);
countries.Add(“Germani”);

}

public void SelectCountry(string countryName)
{
if (countries.Contains(countryName))
selectedCountry = countryName;

foreach (CountryListChangesMonitorBase p in participants)
p.RecieveChange(countryName);
}

public void RegisterMonitorChangers( CountryListChangesMonitorBase monitor)
{
if (!participants.Contains(monitor))
participants.Add(monitor);

monitor.TriggerList = this;
}

}

class CityList:CountryListChangesMonitorBase
{
public override void RecieveChange(string countryName)
{
Console.WriteLine(” Display available City List for : ” + countryName);
}
}

class PhoneNumberTextBox: CountryListChangesMonitorBase
{
public override void RecieveChange(string countryName)
{
Console.WriteLine(” Display phone number code for : ” + countryName);
}
}

Download Code

Interpreter Design Pattern

Introduction:
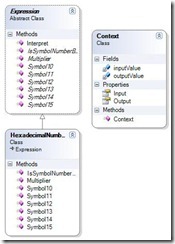
Sometimes you want to define a grammar for special language for certain reasons. After defining the syntax of this language, you need to build an interpreter to interpret the language and do actions accordingly. Interpreter Design Pattern help you to define a well structure object oriented classed to parse your expressions against the new language you defined
Example:

InterpreterDesignPattern


static void Main(string[] args)
{
string hxNumber = Console.ReadLine(); // Hexadecimal number
Context context = new Context(hxNumber);
HexadecimalNumber hex = new HexadecimalNumber();
hex.Interpret(context);
Console.WriteLine(“{0} HexaDecimal Numbering System = {1} Decimal Numbering System” ,hxNumber, context.Output);
// Wait for user
Console.ReadKey();
}
class HexadecimalNumber :Expression
{
public override string Symbol10()
{
return “A”;
}
public override string Symbol11()
{
return “B”;
}
public override string Symbol12()
{
return “C”;
}
public override string Symbol13()
{
return “D”;
}
public override string Symbol14()
{
return “E”;
}
public override string Symbol15()
{
return “F”;
}
public override bool IsSymbolNumberBetween0To9(string num)
{
int tmpNum;
return int.TryParse(num,out tmpNum);
}
public override int Multiplier()
{
return 16;
}
}
abstract class Expression
{
public void Interpret(Context context)
{
if (context.Input.Length == 0)
return;
int value = 0;
if (context.Input.StartsWith(Symbol10()))
{
value = 10;
}
else if (context.Input.StartsWith(Symbol11()))
{
value = 11;
}
else if (context.Input.StartsWith(Symbol12()))
{
value = 12;
}
else if (context.Input.StartsWith(Symbol13()))
{
value = 13;
}
else if (context.Input.StartsWith(Symbol14()))
{
value = 14;
}
else if (context.Input.StartsWith(Symbol15()))
{
value = 15;
}
else if (IsSymbolNumberBetween0To9(context.Input.Substring(0, 1)))
{
value = int.Parse(context.Input.Substring(0, 1));
}
else
{
Console.WriteLine(“Invalid Hexadecimal Number!”);
context.Output = 0;
return;
}
context.Input = context.Input.Substring(1);
context.Output += (int)(value * Math.Pow(Multiplier() , context.Input.Length ));
Interpret(context);
}
public abstract string Symbol10();
public abstract string Symbol11();
public abstract string Symbol12();
public abstract string Symbol13();
public abstract string Symbol14();
public abstract string Symbol15();
public abstract bool IsSymbolNumberBetween0To9(string num);
public abstract int Multiplier();
}
class Context
{
private string inputValue;
private int outputValue;
// Constructor
public Context(string input)
{
this.inputValue = input;
}
// Gets or sets input
public string Input
{
get { return inputValue; }
set { inputValue = value; }
}
// Gets or sets output
public int Output
{
get { return outputValue; }
set { outputValue = value; }
}
}

Download Code

Proxy Design Pattern

Introduction:
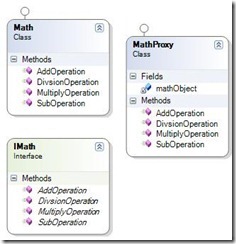
Sometimes you become into a case where you does not or can not reference an object directly, but you still want to interact with that object to do some job. The intent of the proxy design pattern is to control access to an object by providing placeholder for it. Below example will make the idea clear to you.
Example:

ProxyDesignPattern


static void Main()
{
// Create proxy Class
MathProxy proxy = new MathProxy();
// Call Methods
Console.WriteLine(“4 + 2 = ” + proxy.AddOperation(4, 2));
Console.WriteLine(“4 – 2 = ” + proxy.SubOperation(4, 2));
Console.WriteLine(“4 * 2 = ” + proxy.MultiplyOperation(4, 2));
Console.WriteLine(“4 / 2 = ” + proxy.DivsionOperation(4, 2));
// Exit
Console.ReadKey();
}
public interface IMath
{
double AddOperation(double a, double b);
double SubOperation(double a, double b);
double MultiplyOperation(double a, double b);
double DivsionOperation(double a, double b);
}
class Math : IMath
{
public double AddOperation(double a, double b)
{
return a + b;
}
public double SubOperation(double a, double b)
{
return a – b;
}
public double MultiplyOperation(double a, double b)
{
return a * b;
}
public double DivsionOperation(double a, double b)
{
if (b == 0)
return 0;
return a / b;
}
}
class MathProxy : IMath
{
private Math mathObject = new Math();
public double AddOperation(double a, double b)
{
return mathObject.AddOperation(a, b);
}
public double SubOperation(double a, double b)
{
return mathObject.SubOperation(a, b);
}
public double MultiplyOperation(double a, double b)
{
return mathObject.MultiplyOperation(a, b);
}
public double DivsionOperation(double a, double b)
{
return mathObject.DivsionOperation(a, b);
}
}


Download Code

Flyweight Design Pattern

Introduction:
Flyweight design pattern target to minimizes the memory usage by sharing as much data as possible with other similar objects. It is very useful when have large amount of objects in memory which have lot of similar values. by sharing the similar values between all the objects, memory usage will be much less.
Example:
Suppose you want to create an application to manage Employees and form UI perspective you want to display Employees list as Icons and let user control how that icon looks like. But for all employees icons, you will have only one icon style.
All employees sharing the same icon’s attributes, thus there is no need to include the icon’s attributes inside the Employee class. By doing so, you will decrease memory utilization and accordingly make your application more efficient.
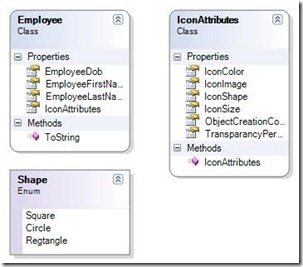
Below is a diagram that showing how we will use Flyweight design pattern

FlyweightDesignPattern


enum Shape { Square, Circle, Regtangle };
class IconAttributes
{
public IconAttributes()
{
ObjectCreationCounter++;
}
public static int ObjectCreationCounter{ get; set; }
public Color IconColor { get; set; }
public Size  IconSize { get; set; }
public Shape IconShape { get; set; }
public Image IconImage { get; set; }
public int TransparancyPercentage { get; set; }
}
class Employee
{
public IconAttributes IconAttributes { get; set; }
public string EmployeeFirstName { get; set; }
public string EmployeeLastName { get; set; }
public DateTime EmployeeDob { get; set; }
public override string ToString()
{
return “FirstName:  ” + EmployeeFirstName +
”          LastName:  ” + EmployeeLastName +Environment.NewLine +
”          Dob:       ” + EmployeeDob.ToString () + Environment.NewLine +
“Icone Coloe” + IconAttributes.IconColor.ToString() +
”          Icon Shape:  ” + IconAttributes.IconShape.ToString()+ Environment.NewLine +
“=====================================” + Environment.NewLine;
}
}
static void Main(string[] args)
{
IconAttributes iconAttribue = new IconAttributes();
iconAttribue.IconColor = Color.Red;
iconAttribue.IconShape = Shape.Regtangle;
iconAttribue.IconSize = new Size(10, 10);
iconAttribue.TransparancyPercentage = 100;
Employee e;
List<Employee> employees = new List<Employee>();
for (int i = 0; i < 5; i++)
{
e = new Employee();
e.EmployeeFirstName = “FirstName ” + i.ToString();
e.EmployeeLastName = “LastName ” + i.ToString();
e.EmployeeDob = new DateTime(1982, 3, 20);
e.IconAttributes = iconAttribue;
employees.Add(e);
}
foreach (Employee emp in employees)
{
Console.WriteLine(emp.ToString());
}
Console.WriteLine(“++++++++++++++++++++++++++++++++++++++++”);
Console.WriteLine(“ObjectCreationCounter for IconAttributes   : ” + IconAttributes.ObjectCreationCounter.ToString());
Console.ReadKey();
}


Download Code

Façade (Facade) Design Pattern

Introduction:
Façade is one of the most used design patterns on software industry. Basically it is about providing a simple interface for large body of code, like class library and it will help you on :

  1. Make large body of code easier to be understand.
  2. Make client code more readable.
  3. Reduce dependency of client code on class library, thus you will be able to change the internal implementation of your component without affecting client code.
  4. Wrap a bad-designed APIs with a single well-designed ASPI

A Façade design pattern is used when you want to implement a new way to use component which is easier and more convenient. While Adapter design pattern is used when an interface must match a specific contract and it should support polymorphic behavior.
Example:

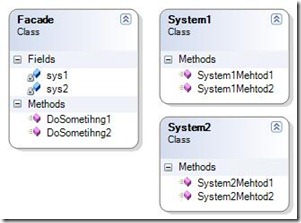
FacadeDesignPattern


class Program
{
static void Main(string[] args)
{
Facade fcadeInstance = new Facade();
Console.WriteLine(“Calling DoSometihng1() Method”);
fcadeInstance.DoSometihng1();
Console.WriteLine(“——————-“);
Console.WriteLine(“Calling DoSometihng2() Method”);
fcadeInstance.DoSometihng2();
Console.ReadKey();
}
class Facade
{
private System1 sys1 = new System1();
private System2 sys2 = new System2();
public void DoSometihng1()
{
Console.WriteLine(sys1.System1Mehtod1());
Console.WriteLine(sys2.System2Mehtod1());
}
public void DoSometihng2()
{
Console.WriteLine(sys1.System1Mehtod2());
Console.WriteLine(sys2.System2Mehtod2());
}
}
class System1
{
public string System1Mehtod1()
{
return “System   1  Mehtod   1 is called”;
}
public string System1Mehtod2()
{
return “System   1  Mehtod   2 is called”;
}
}
class System2
{
public string System2Mehtod1()
{
return “System   2  Mehtod   1 is called”;
}
public string System2Mehtod2()
{
return “System   2  Mehtod   2 is called”;
}
}

Download Code