Interpreter Design Pattern

Introduction:
Sometimes you want to define a grammar for special language for certain reasons. After defining the syntax of this language, you need to build an interpreter to interpret the language and do actions accordingly. Interpreter Design Pattern help you to define a well structure object oriented classed to parse your expressions against the new language you defined
Example:

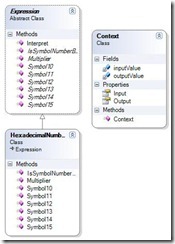
InterpreterDesignPattern


static void Main(string[] args)
{
string hxNumber = Console.ReadLine(); // Hexadecimal number
Context context = new Context(hxNumber);
HexadecimalNumber hex = new HexadecimalNumber();
hex.Interpret(context);
Console.WriteLine(“{0} HexaDecimal Numbering System = {1} Decimal Numbering System” ,hxNumber, context.Output);
// Wait for user
Console.ReadKey();
}
class HexadecimalNumber :Expression
{
public override string Symbol10()
{
return “A”;
}
public override string Symbol11()
{
return “B”;
}
public override string Symbol12()
{
return “C”;
}
public override string Symbol13()
{
return “D”;
}
public override string Symbol14()
{
return “E”;
}
public override string Symbol15()
{
return “F”;
}
public override bool IsSymbolNumberBetween0To9(string num)
{
int tmpNum;
return int.TryParse(num,out tmpNum);
}
public override int Multiplier()
{
return 16;
}
}
abstract class Expression
{
public void Interpret(Context context)
{
if (context.Input.Length == 0)
return;
int value = 0;
if (context.Input.StartsWith(Symbol10()))
{
value = 10;
}
else if (context.Input.StartsWith(Symbol11()))
{
value = 11;
}
else if (context.Input.StartsWith(Symbol12()))
{
value = 12;
}
else if (context.Input.StartsWith(Symbol13()))
{
value = 13;
}
else if (context.Input.StartsWith(Symbol14()))
{
value = 14;
}
else if (context.Input.StartsWith(Symbol15()))
{
value = 15;
}
else if (IsSymbolNumberBetween0To9(context.Input.Substring(0, 1)))
{
value = int.Parse(context.Input.Substring(0, 1));
}
else
{
Console.WriteLine(“Invalid Hexadecimal Number!”);
context.Output = 0;
return;
}
context.Input = context.Input.Substring(1);
context.Output += (int)(value * Math.Pow(Multiplier() , context.Input.Length ));
Interpret(context);
}
public abstract string Symbol10();
public abstract string Symbol11();
public abstract string Symbol12();
public abstract string Symbol13();
public abstract string Symbol14();
public abstract string Symbol15();
public abstract bool IsSymbolNumberBetween0To9(string num);
public abstract int Multiplier();
}
class Context
{
private string inputValue;
private int outputValue;
// Constructor
public Context(string input)
{
this.inputValue = input;
}
// Gets or sets input
public string Input
{
get { return inputValue; }
set { inputValue = value; }
}
// Gets or sets output
public int Output
{
get { return outputValue; }
set { outputValue = value; }
}
}

Download Code

Proxy Design Pattern

Introduction:
Sometimes you become into a case where you does not or can not reference an object directly, but you still want to interact with that object to do some job. The intent of the proxy design pattern is to control access to an object by providing placeholder for it. Below example will make the idea clear to you.
Example:

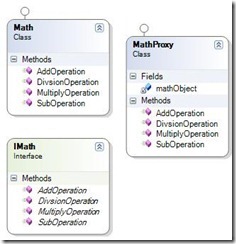
ProxyDesignPattern


static void Main()
{
// Create proxy Class
MathProxy proxy = new MathProxy();
// Call Methods
Console.WriteLine(“4 + 2 = ” + proxy.AddOperation(4, 2));
Console.WriteLine(“4 – 2 = ” + proxy.SubOperation(4, 2));
Console.WriteLine(“4 * 2 = ” + proxy.MultiplyOperation(4, 2));
Console.WriteLine(“4 / 2 = ” + proxy.DivsionOperation(4, 2));
// Exit
Console.ReadKey();
}
public interface IMath
{
double AddOperation(double a, double b);
double SubOperation(double a, double b);
double MultiplyOperation(double a, double b);
double DivsionOperation(double a, double b);
}
class Math : IMath
{
public double AddOperation(double a, double b)
{
return a + b;
}
public double SubOperation(double a, double b)
{
return a – b;
}
public double MultiplyOperation(double a, double b)
{
return a * b;
}
public double DivsionOperation(double a, double b)
{
if (b == 0)
return 0;
return a / b;
}
}
class MathProxy : IMath
{
private Math mathObject = new Math();
public double AddOperation(double a, double b)
{
return mathObject.AddOperation(a, b);
}
public double SubOperation(double a, double b)
{
return mathObject.SubOperation(a, b);
}
public double MultiplyOperation(double a, double b)
{
return mathObject.MultiplyOperation(a, b);
}
public double DivsionOperation(double a, double b)
{
return mathObject.DivsionOperation(a, b);
}
}


Download Code

Flyweight Design Pattern

Introduction:
Flyweight design pattern target to minimizes the memory usage by sharing as much data as possible with other similar objects. It is very useful when have large amount of objects in memory which have lot of similar values. by sharing the similar values between all the objects, memory usage will be much less.
Example:
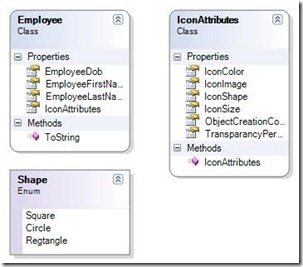
Suppose you want to create an application to manage Employees and form UI perspective you want to display Employees list as Icons and let user control how that icon looks like. But for all employees icons, you will have only one icon style.
All employees sharing the same icon’s attributes, thus there is no need to include the icon’s attributes inside the Employee class. By doing so, you will decrease memory utilization and accordingly make your application more efficient.
Below is a diagram that showing how we will use Flyweight design pattern

FlyweightDesignPattern


enum Shape { Square, Circle, Regtangle };
class IconAttributes
{
public IconAttributes()
{
ObjectCreationCounter++;
}
public static int ObjectCreationCounter{ get; set; }
public Color IconColor { get; set; }
public Size  IconSize { get; set; }
public Shape IconShape { get; set; }
public Image IconImage { get; set; }
public int TransparancyPercentage { get; set; }
}
class Employee
{
public IconAttributes IconAttributes { get; set; }
public string EmployeeFirstName { get; set; }
public string EmployeeLastName { get; set; }
public DateTime EmployeeDob { get; set; }
public override string ToString()
{
return “FirstName:  ” + EmployeeFirstName +
”          LastName:  ” + EmployeeLastName +Environment.NewLine +
”          Dob:       ” + EmployeeDob.ToString () + Environment.NewLine +
“Icone Coloe” + IconAttributes.IconColor.ToString() +
”          Icon Shape:  ” + IconAttributes.IconShape.ToString()+ Environment.NewLine +
“=====================================” + Environment.NewLine;
}
}
static void Main(string[] args)
{
IconAttributes iconAttribue = new IconAttributes();
iconAttribue.IconColor = Color.Red;
iconAttribue.IconShape = Shape.Regtangle;
iconAttribue.IconSize = new Size(10, 10);
iconAttribue.TransparancyPercentage = 100;
Employee e;
List<Employee> employees = new List<Employee>();
for (int i = 0; i < 5; i++)
{
e = new Employee();
e.EmployeeFirstName = “FirstName ” + i.ToString();
e.EmployeeLastName = “LastName ” + i.ToString();
e.EmployeeDob = new DateTime(1982, 3, 20);
e.IconAttributes = iconAttribue;
employees.Add(e);
}
foreach (Employee emp in employees)
{
Console.WriteLine(emp.ToString());
}
Console.WriteLine(“++++++++++++++++++++++++++++++++++++++++”);
Console.WriteLine(“ObjectCreationCounter for IconAttributes   : ” + IconAttributes.ObjectCreationCounter.ToString());
Console.ReadKey();
}


Download Code

Façade (Facade) Design Pattern

Introduction:
Façade is one of the most used design patterns on software industry. Basically it is about providing a simple interface for large body of code, like class library and it will help you on :

  1. Make large body of code easier to be understand.
  2. Make client code more readable.
  3. Reduce dependency of client code on class library, thus you will be able to change the internal implementation of your component without affecting client code.
  4. Wrap a bad-designed APIs with a single well-designed ASPI

A Façade design pattern is used when you want to implement a new way to use component which is easier and more convenient. While Adapter design pattern is used when an interface must match a specific contract and it should support polymorphic behavior.
Example:

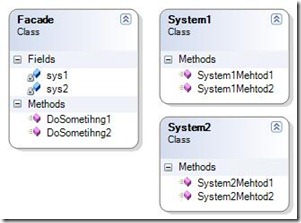
FacadeDesignPattern


class Program
{
static void Main(string[] args)
{
Facade fcadeInstance = new Facade();
Console.WriteLine(“Calling DoSometihng1() Method”);
fcadeInstance.DoSometihng1();
Console.WriteLine(“——————-“);
Console.WriteLine(“Calling DoSometihng2() Method”);
fcadeInstance.DoSometihng2();
Console.ReadKey();
}
class Facade
{
private System1 sys1 = new System1();
private System2 sys2 = new System2();
public void DoSometihng1()
{
Console.WriteLine(sys1.System1Mehtod1());
Console.WriteLine(sys2.System2Mehtod1());
}
public void DoSometihng2()
{
Console.WriteLine(sys1.System1Mehtod2());
Console.WriteLine(sys2.System2Mehtod2());
}
}
class System1
{
public string System1Mehtod1()
{
return “System   1  Mehtod   1 is called”;
}
public string System1Mehtod2()
{
return “System   1  Mehtod   2 is called”;
}
}
class System2
{
public string System2Mehtod1()
{
return “System   2  Mehtod   1 is called”;
}
public string System2Mehtod2()
{
return “System   2  Mehtod   2 is called”;
}
}

Download Code

Substring Java Script function (left and right)

There is no built in functions inside Jscript to extract left or right substring from specific string… the following functions are customized to do so..

function LeftSubString(stringValue, length)
{
if (length <= 0)
    return "";
else if (length > String(stringValue).length)
    return stringValue;
else
    return String(stringValue).substring(0,length);
}

function RightSubString(stringValue, length){
if (length <= 0)
    return "";
else if (length > String(stringValue).length)
    return stringValue;
else {
     var iLen = String(stringValue).length;
     return String(stringValue).substring(iLen, iLen – length);
    }
}

Composite Design Pattern

Introduction:
Sometimes you want to treat a group of objects as a single instance. Composite design pattern is aiming to compose object into a structure of tree to represent part-whole hierarchy structures.
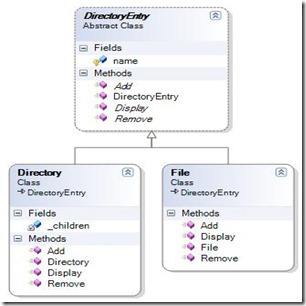
A simple example of this design pattern is directory structure.. Each directory might contains some entries and those entries might be a directory. Which leads us to a tree hierarchy structure.
Example:

CompositeDesignPattern


class Program
{
static void Main(string[] args)
{
Directory dir = new Directory(“c:”);
dir.Add(new File(“File 1”));
dir.Add(new File(“File 2”));
Directory dir2 = new Directory(“Program Files”);
dir2.Add(new File(“Program 1”));
dir2.Add(new File(“Program 2”));
dir.Add(dir2);
dir.Display(0,0);
Console.ReadKey();
}
}
abstract class DirectoryEntry
{
protected string name;
// Constructor
public DirectoryEntry(string name)
{
this.name = name;
}
public abstract void Add(DirectoryEntry entry);
public abstract void Remove(DirectoryEntry entry);
public abstract void Display(int depth,int leadingSpaces);
}
class File : DirectoryEntry
{
public File(string name ) :base(name)
{
}
public override void Add(DirectoryEntry entry)
{
Console.WriteLine(“Cannot add to a File”);
}
public override void Remove(DirectoryEntry entry)
{
Console.WriteLine(“Cannot remove from a File”);
}
public override void Display(int depth, int leadingSpaces)
{
Console.WriteLine(new string(‘ ‘, leadingSpaces) +  “|” + new String(‘-‘, depth) + name);
}
}
class Directory : DirectoryEntry
{
private List<DirectoryEntry> _children = new List<DirectoryEntry>();
public Directory(string name) : base(name)
{
}
public override void Add(DirectoryEntry entry)
{
_children.Add(entry);
}
public override void Remove(DirectoryEntry entry)
{
_children.Remove(entry);
}
public override void Display(int depth, int leadingSpaces)
{
Console.WriteLine( new string(‘ ‘ , leadingSpaces) + “|” + new string(‘-‘ ,  depth)  + name);
// Recursively display child nodes
foreach (DirectoryEntry entry in _children)
{
entry.Display(depth + 2, leadingSpaces+2);
}
}
}


Download Code

Bridge Design Pattern

Introduction:
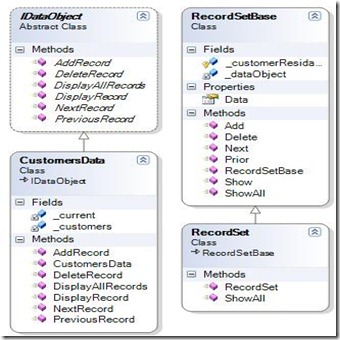
Sometimes you want to decouple the abstraction from its implementation so both of them can be vary independently. Bridge design pattern helps you in implementing this decoupling easily. The bridge uses encapsulation, aggregation, and can use inheritance to separate responsibilities into different classes
Example:

BridgeDesignPattern


static void Main()
{
// Create Record Set Manager
RecordSet customers = new RecordSet(“Jordan”);
// Set ConcreteImplementor which is in this case is Customer Data.
customers.Data = new CustomersData();
// Exercise the bridge
customers.Show();
customers.Next();
customers.Show();
customers.Next();
customers.Show();
customers.Add(“New Customer”);
customers.ShowAll();
// Exit
Console.ReadKey();
}
class RecordSet : RecordSetBase
{
// Constructor
public RecordSet(string CustomerResidancyGroup)
: base(CustomerResidancyGroup)
{
}
public override void ShowAll()
{
Console.WriteLine();
Console.WriteLine(“************************”);
base.ShowAll();
Console.WriteLine(“************************”);
}
}
class RecordSetBase
{
private IDataObject _dataObject;
protected string _customerResidancyGroup;
public RecordSetBase(string customerResidancyGroup)
{
this._customerResidancyGroup = customerResidancyGroup;
}
// Property
public IDataObject Data
{
set { _dataObject = value; }
get { return _dataObject; }
}
public virtual void Next()
{
_dataObject.NextRecord();
}
public virtual void Prior()
{
_dataObject.PreviousRecord();
}
public virtual void Add(string customer)
{
_dataObject.AddRecord(customer);
}
public virtual void Delete(string customer)
{
_dataObject.DeleteRecord(customer);
}
public virtual void Show()
{
_dataObject.DisplayRecord();
}
public virtual void ShowAll()
{
Console.WriteLine(“Customer Group: ” + _customerResidancyGroup);
_dataObject.DisplayAllRecords();
}
}
class CustomersData : IDataObject
{
private List<string> _customers = new List<string>();
private int _current = 0;
public CustomersData()
{
// Loaded from a database
_customers.Add(“Customer 1”);
_customers.Add(“Customer 2”);
_customers.Add(“Customer 3”);
_customers.Add(“Customer 4”);
_customers.Add(“Customer 5″);
}
public void NextRecord()
{
if (_current <= _customers.Count – 1)
{
_current++;
}
}
public void PreviousRecord()
{
if (_current > 0)
{
_current–;
}
}
public void AddRecord(string customer)
{
_customers.Add(customer);
}
public void DeleteRecord(string customer)
{
_customers.Remove(customer);
}
public void DisplayRecord()
{
Console.WriteLine(_customers[_current]);
}
public void DisplayAllRecords()
{
foreach (string customer in _customers)
{
Console.WriteLine(” ” + customer);
}
}
}
interface IDataObject
{
void NextRecord();
void PreviousRecord();
void AddRecord(string name);
void DeleteRecord(string name);
void DisplayRecord();
void DisplayAllRecords();
}


Download Code

Reading Data from Excel by using SQL Statements & ODBC

In many cases I had to query data from excel sheet with large number of records … of course I can do this by using filtering feature from MS excel, many developer prefer writing sql statements instead of using filtering feature built into MS Excel. Using Sql statements to query data from Excel sheet will make developer life easier. You can load this sheet into DB server then query it using the ordinary tables, actually this is not the optimum solution for this case.. You can query excel sheet without load it into DB server.

By using ODBC you can query excel sheet’s data without loading it into DB from inside Query analyzer or MS Sql Management studio…. It is very simple query and u can even filter by writing your own WHERE condition.

To query data form MS Excel 2003 you can use the following Select Statement:

SELECT *

FROM OPENROWSET(‘Microsoft.Jet.OLEDB.4.0’, ‘Excel 8.0;DATABASE=FileNameWithPath.xls’,

‘Select * from [Sheet1$]’)

And form MS Excel 2007 you can use the following select statement:

SELECT *

FROM OPENROWSET(‘Microsoft.ACE.OLEDB.12.0′,’Excel 12.0;Database=FileNameWithPath.xlsx;HDR=No;IMEX=1’,

‘select * from [Sheet1$]’)

For example:

Suppose you have an excel sheet with 3 columns; firstName,lastName and Email.And this sheet is stored at C:\Filename.xsl on your hard drive… to query this file:

SELECT *

FROM OPENROWSET(‘Microsoft.Jet.OLEDB.4.0’, ‘Excel 8.0;DATABASE=c:\filename.xls’,

‘Select * from [Sheet1$]’)

Abstract Factory Design Pattern

Introduction:

Sometimes you want to create an instance of class that is related to a family of classes without specifying the exact concert class. Factory design pattern came to solve this issue and make it easy for us.

In order to avoid duplicating the code that make the decision everywhere an instance is created, we need a mechanism for creating instances of related classes without necessarily knowing which will be instantiated.

There are 2 types of Factory Design Pattern:

  1. Simple Factory: the result of the Factory method is a subclass (inherited class) of the Abstract Class. The choice of which subclass to instantiate is completely defined by which method is used, and is unknown to the client.
  2. Abstract Factory: an abstract class defining a common protocol of Factory methods. Concrete subclasses of the abstract factory implement this protocol to answer instances of the appropriate suite of classes.

Example:

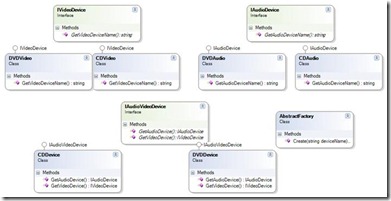
Suppose we have 2 Audio/Video devices (CD & DVD ). Both devices has audio and video features but those devices does not have the same shared parent class. And we need to simplify the creational of objects. The best solution for this is to go with abstract factory design pattern. Below is the diagram illustrating how we can design classes to serve the main purpose.

Interfaces:

  • IVideoDevice: is the interface that all Video classes inherits.
  • IAudioDevice: is the interface that all Audio classes inherits.
  • IAudioVideoDevice: is the interface that all Audio/Video classes inherits.

Classes:

  • CDAudio: Inherits from IAudioDevice and implement the needed methods.
  • CDVideo: Inherits from IVideoDevice and implement the needed methods.
  • CDDevice: Inherits from IAudioVideoDevice and create the correct Audio/Video devices.
  • DVDAuio: Inherits from IAudioDevice and implement the needed methods.
  • DVDVideo: Inherits from IVideoDevice and implement the needed methods.
  • DVDDevice: Inherits from IAudioVideoDevice and create the correct Audio/Video devices.
  • AbstractFactory: Is responsible of creating the correct Audio/Video objects according to a string parameter passed to it( this might be changed to enum or something like that)

FactoryDesignPattern

static void Main(string[] args)
{
string deviceName;
deviceName = Console.ReadLine();
IAudioVideoDevice device = AbstractFactory.Create(deviceName);
Console.WriteLine(device.GetAudioDevice().GetAudioDeviceName());
Console.WriteLine(device.GetVideoDevice().GetVideoDeviceName());
Console.ReadKey();
}
class AbstractFactory
{
public static IAudioVideoDevice Create( string deviceName)
{
switch (deviceName.ToLower())
{
case “CD”:
return new  CDDevice();
case “dvd”:
return new DVDDevice();
default:
return new CDDevice();
}
}
}
class DVDDevice:IAudioVideoDevice
{
#region IAudioVideoDevice Members
public IAudioDevice GetAudioDevice()
{
return new DVDAudio();
}
public IVideoDevice GetVideoDevice()
{
return new DVDVideo();
}
#endregion
}
class CDDevice:IAudioVideoDevice
{
#region IAudioVideoDevice Members
public IAudioDevice GetAudioDevice()
{
return new CDAudio();
}
public IVideoDevice GetVideoDevice()
{
return new CDVideo();
}
#endregion
}
class CDAudio:IAudioDevice
{
#region IAudioDevice Members
public string GetAudioDeviceName()
{
return “CD Audio”;
}
#endregion
}
class CDVideo:IVideoDevice
{
#region IVideoDevice Members
public string GetVideoDeviceName()
{
return “CD Video”;
}
#endregion
}
class DVDAudio:IAudioDevice
{
#region IAudioDevice Members
public string GetAudioDeviceName()
{
return “DVD Audio”;
}
#endregion
}
class DVDVideo:IVideoDevice
{
#region IVideoDevice Members
public string GetVideoDeviceName()
{
return “DVD Video”;
}
#endregion
}
interface IAudioVideoDevice
{
IAudioDevice GetAudioDevice();
IVideoDevice GetVideoDevice();
}
interface IAudioDevice
{
string GetAudioDeviceName();
}
interface IVideoDevice
{
string GetVideoDeviceName();
}

Download Code

Prototype Design Pattern

Introduction:
Sometimes we have a case where we want to build an object based on another object instead of creating a new fresh object each time, we can make a copy of an already existing object instantly and start using the new created object. By doing so, we do not have to repeat the building process each time. The newly created object will be independent from the old one.
We can use the Prototype Design Pattern to solve this issue.
Example:
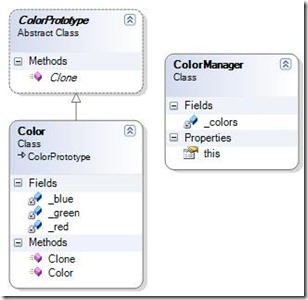
On the following example we will create couple of color objects then Cline those objects into new instances.

PrototypeDesignPattern


abstract class ColorPrototype
{
public abstract ColorPrototype Clone();
}

class ColorManager
{
private Dictionary<string, ColorPrototype> _colors = new Dictionary<string, ColorPrototype>();
// Indexer
public ColorPrototype this[string key]
{
get { return _colors[key]; }
set { _colors.Add(key, value); }
}
}

class Color : ColorPrototype
{
private int _red;
private int _green;
private int _blue;
// Constructor
public Color(int red, int green, int blue)
{
this._red = red;
this._green = green;
this._blue = blue;
}
// Create a shallow copy
public override ColorPrototype Clone()
{
Console.WriteLine(
“Cloning color RGB: ” + _red.ToString() + ” , ” +
_green.ToString() + ” , ” + _blue.ToString());
return this.MemberwiseClone() as ColorPrototype;
}
}

static void Main(string[] args)
{
ColorManager colormanager = new ColorManager();
// Initialize with standard colors
colormanager[“RED”] = new Color(255, 0, 0);
colormanager[“GREEN”] = new Color(0, 255, 0);
colormanager[“BLUE”] = new Color(0, 0, 255);
// User adds personalized colors
colormanager[“ANGRY”] = new Color(255, 12, 0);
colormanager[“PEACE”] = new Color(128, 200, 128);
colormanager[“FLAME”] = new Color(211, 150, 20);
// User clones selected colors
Color color1 = colormanager[“RED”].Clone() as Color;
Color color2 = colormanager[“PEACE”].Clone() as Co  lor;
Color color3 = colormanager[“FLAME”].Clone() as Color;
// Wait for user
Console.ReadKey();
}

Download Code