The performance of any system is considered as a key part of the requirements that client usually ask for implicitly. The poor perform application is most likely going to be failed because of that even if it is doing lot of very cool functionalities.
Recently I read an interesting article about this topic published on CodeGuru. They highlighted couple of key actions that is easy to be implemented and they are almost effortless but at the end those actions will improve the overall performance of you application by better utilization of server CPUs.
They depending on the fact that the CPUs we have these days is much sophisticated that previous days and we need to take benefits of that. I strongly recommend reading this article
How to create OOP representations of XML
If you have an XML file and you are seeking for the best way to deal with it inside your code. You do not want to use XPath Queries intensively in your code and want to have the best way to deal with that XML… I faced such a case where I need to build a special configuration file for an FTP windows service. The way I wanted to build this XML file was in a hierarchy way something looks like the following XML:
|
<FtpConnection Code="CodeName" Direction="Upload"> <Ftp> <RemoteHost>IP or the DNS name for the remote FTP server</RemoteHost> <Username>FTP USerName</Username> <Password>password</Password> <ConnectionTimeOut>50</ConnectionTimeOut> </Ftp> <Security> <IsSecured>true</IsSecured> <ScretPhase>Sec Phrase Goes here</ScretPhase> </Security> </FtpConnection> |
This FTP service suppose to work with more than on FTPConnection. Thus the above configuration snap might occur more than one time. Which make it is harder to deal with .
The best way to deal with this configuration inside code is to create a object oriented representation of it and load this XML into it. then let your code deal with the OOP classes instead of directly with XML.
Well, there is a very easy way to build a OOP presentation of this XML. There is a tool that is shipped with .Net framework & visual studio called XSD. You can use this tool to generate the OOP representation by first create XSD schema for your XML then convert that schema to OOP presentations. Below is how to do that step by step.
- I created a file on my desktop and I called it "FTPConfig.xml", I paste the following XML into it.
|
<Root> <FtpConnection Code="CodeName" Direction="Upload"> <Ftp> <RemoteHost>IP or the DNS name for the remote FTP server</RemoteHost> <Username>FTP USerName</Username> <Password>password</Password> <ConnectionTimeOut>50</ConnectionTimeOut> </Ftp> <Security> <IsSecured>true</IsSecured> <ScretPhase>Sec Phrase Goes here</ScretPhase> </Security> </FtpConnection> <FtpConnection Code="Code2Name" Direction="Upload"> <Ftp> <RemoteHost>IP or the DNS name for the remote FTP server</RemoteHost> <Username>FTP USerName</Username> <Password>password</Password> <ConnectionTimeOut>50</ConnectionTimeOut> </Ftp> <Security> <IsSecured>true</IsSecured> <ScretPhase>Sec Phrase Goes here</ScretPhase> </Security> </FtpConnection> </Root> |
· Note that I duplicated the FTPConnection tag twice, I did that for a purpose. I did that to tell XSD tool to expect this tag to occur more than once. Thus when XSD tool build the Schema representation of it, it will make the MAX occurrence of this tag as infinite
2. From Start menu, open "Visual Studio 2008 Command Prompt"… it is Command prompt but has special configurations to open some Command Prompt tools shipped with VS 2008
3. We need to set the current folder on CMD to be the desktop. To do so, write the following comand
Cd c:\users\[windowsUserName]\desktop
· Where [WindowsUserName] is the login name that you are using to login into your PC
4. Now we need to create the XSD schema file for this XML. To do that, write the following command into your CMD
xsd FTPConfig.xml
· The output from this command is an XSD file and it will placed on your Desktop; the name of this XSD file suppose to be FTPConfig.xsd; My advice to you is to take couple of minutes to review this Schema file and make sure it is meeting your expectation.
5. Now we need to Create the OOP presentation of this XSD; to do so, write the following command
xsd FTPConfig.xsd /classes /language:CS
a. The meaning of parameter /Classes : will make the output of this command to be Classes not DataSet.
b. While the Meaning of parameter /language is the programming language in which the code will be generated; CS means C# language
The output form this command suppose a C# code placed on your desktop.
- My recommendation to you is to keep all the generated classes into a single class and do not split each class into a separated file. I am saying this because you might decide to change the configuration a little bit and you need to regenerate those classes again. So if you split those classes into different files, then you will get into a loop of re-splitting the classes again and again.
I hope you will find this topic helpful. Please feel free to send any comments/questions.
What is Unit testing and what benefits I will have if I apply it on my project
What is Unit Test:
In computer programming, unit testing is a software design and development method where the programmer verifies that individual units of source code are working properly. A unit is the smallest testable part of an application.
In OOP, the smallest unit is a method, which may belong to a base/super class, abstract class or derived/child class.
Unit testing is typically done by software developers to ensure that the code other developers have written meets software requirements and behaves as the developer intended.
Benefits of Applying Unit Test:
- Using developer time for manual ad hoc testing is not a cost effective way of ensuring software quality. (Code coverage, breaking code by others, did I test all functionalities)
- Human tester can and will make mistakes.. Even if Company have QA, discovering issues at QA side is more expensive than @ DEV side.
- unit tests find problems early in the development cycle.
- an automated unit test suite watches over your code in two dimensions: time and space
- developers will be less afraid to change existing code
- the development process becomes more flexible (Sending hotfixes more quickly)
- Improves your project’s truck factor:
Truck factor is the minimum number of developers that if hit by a truck the project would grind to a halt. If you have one key developer who works on a subsystem that no-one else knows, then your truck factor is effectively “1”. Obviously, having truck factor of “1” is a risk on the project.
A comprehensive unit test suite improves truck factor because it makes it easier for a developer to take over a piece of code she is not intimately familiar with. A developer can start working on code written by others because the unit tests will guide the developer by pointing it out if she makes an error. Losing a key developer for any reason just before a release is less of a catastrophe if you have the safety net of unit tests.
- reduces the need for manual testing
Flavors of Unit testing:
- Point unit tests exercise a small piece of functionality, e.g., just one method or methods of a class.
- End-to-End tests exercise one feature across many, sometimes all, layers of an application; An ideal end-to-end test works like an end user story
Test Driven Programming model: Developer start developing test methods and basic functions that make test methods success, then enhance code at methods to make sure it will cover all expected/unexpected cases.
As a rule, before a developer checks in any code into the main source control repository, she should get the latest versions of the unit tests from the version control on her development machine and run all the tests locally. Only after all unit tests pass should the developer check in new code. This ensures that the source code in the version control system remains healthy at all times and can be used to rebuild the system at any time.
In real life, developers may accidentally check in code that does not work. The daily build should be your main line of defense against these bugs.
Real Word Facts:
Trusting unit tests blindly as in: "if unit tests pass, code is ready for production" is a recipe for shipping bugs. Even if we have a comprehensive unit test suite that is run frequently, bugs can still sneak in and some amount of manual testing by humans is needed.
What if Bug appear on Production:
We need to do "post mortem" analysis.. One of the following things turned out:
- We have 2 bugs: one inside actual Code and the other inside Unit test code.
- There is no unit test code that testing this functionality.
- Production environment is different from Test environment.
Finally, If you have plenty of time at your project to apply Unit testing on it, the I would strongly recommend applying it.
State Design Pattern
Introduction:
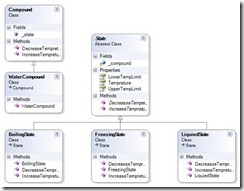
Sometimes you want to build a class where its behavior changed according to its state. State Design pattern provides a good class structure to solve this issue. State Design pattern also known as Object for state pattern is used to represent the state of an object and the object behavior will changed according to state changes.
Example:
| static void Main(string[] args) { WaterCompound c = new WaterCompound(0); c.IncreaseTempreture(10); c.IncreaseTempreture(100); c.DecreaseTempreture(99); c.DecreaseTempreture(40); c.DecreaseTempreture(50); Console.ReadKey(); } class WaterCompound : Compound { public WaterCompound(int temp) { _state = new LiquiedState(this,temp,0,100); } } public class Compound { public State _state; public void IncreaseTempreture(int temp) { _state.IncreaseTempreture(temp); Console.WriteLine(” Balance = {0:D}”, _state.Tempreture); Console.WriteLine(” Status = {0}\n”, this._state.GetType().Name); Console.WriteLine(“—————-“); } public void DecreaseTempreture(int temp) { _state.DecreasseTempreture(temp); Console.WriteLine(” Balance = {0:D}”, _state.Tempreture); Console.WriteLine(” Status = {0}\n”, this._state.GetType().Name); Console.WriteLine(“—————-“); } } public abstract class State { protected Compound _compound; public int LowerTempLimit { get; set; } public int UpperTempLimit { get; set; } public int Tempreture { get; set; } public abstract void IncreaseTempreture(int temp); public abstract void DecreasseTempreture(int temp); } class BoilingState:State { public BoilingState(Compound c,int temp,int lowerTemp,int Uppertemp) { Tempreture = temp; base._compound = c; LowerTempLimit = lowerTemp; UpperTempLimit = Uppertemp; } public override void IncreaseTempreture(int temp) { Tempreture += temp; } public override void DecreasseTempreture(int temp) { Tempreture -= temp; if (Tempreture < LowerTempLimit) base._compound._state = new LiquiedState(_compound, Tempreture,0,100); } } class FreezingState:State { public FreezingState(Compound c,int temp,int lowerTemp,int Uppertemp) { Tempreture = temp; base._compound = c; LowerTempLimit = lowerTemp; UpperTempLimit = Uppertemp; } public override void IncreaseTempreture(int temp) { Tempreture += temp; if (Tempreture > UpperTempLimit) _compound._state = new LiquiedState(_compound, Tempreture,0,100); } public override void DecreasseTempreture(int temp) { Tempreture -= temp; } } class LiquiedState:State { public LiquiedState(Compound c,int temp,int lowerTemp,int Uppertemp) { Tempreture = temp; base._compound = c; LowerTempLimit = lowerTemp; UpperTempLimit = Uppertemp; } public override void IncreaseTempreture(int temp) { Tempreture += temp; if (Tempreture > UpperTempLimit) _compound._state = new BoilingState(_compound, Tempreture,101,100000); } public override void DecreasseTempreture(int temp) { Tempreture -= temp; if (Tempreture < LowerTempLimit) _compound._stae = new FreezingState(_compound, Tempreture,-150,-1); } } |
Command Design Pattern
Introduction:
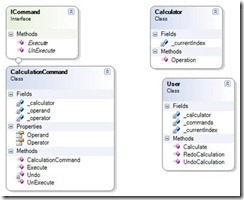
Command Design Pattern enables you to encapsulate a request as an object, thereby letting you parameterize clients with different requests, queue or log requests, and support undoable operations.
Example:
The below code demonstrates the Command pattern to be used on a simple calculator. This caluclator doing unlimited number of undo’s & Redo’s .
One thing we might do to extend this Calculator project, is to create an IOperator Interface and for each operation have a concret Operator Class. for simplicity I am not going to do this. I will hard code couple of operator to make it very simple to be understood.
| static void Main() { // Create user and let her compute User user = new User(); // User presses calculator buttons user.Calculate(‘+’, 100); user.Calculate(‘-‘, 50); user.Calculate(‘*’, 10); user.Calculate(‘/’, 2); // Undo 4 commands user.UndoCalculation(4); // Redo 3 commands user.RedoCalculation(3); // Wait for user Console.ReadKey(); } interface ICommand { void Execute(); void UnExecute(); } class CalculationCommand : ICommand { private char _operator; private int _operand; private Calculator _calculator; // Constructor public CalculationCommand(Calculator calculator, char @operator, int operand) { this._calculator = calculator; this._operator = @operator; this._operand = operand; } // Gets operator public char Operator { set { _operator = value; } } // Get operand public int Operand { set { _operand = value; } } // Execute new command public void Execute() { _calculator.Operation(_operator, _operand); } // Unexecute last command public void UnExecute() { _calculator.Operation(Undo(_operator), _operand); } // Returns opposite operator for given operator private char Undo(char @operator) { switch (@operator) { case ‘+’: return ‘-‘; case ‘-‘: return ‘+’; case ‘*’: return ‘/’; case ‘/’: return ‘*’; default: throw new ArgumentException(“@operator”); } } } class Calculator { private int _currentIndex = 0; public void Operation(char @operator, int operand) { switch (@operator) { case ‘+’: _currentIndex += operand; break; case ‘-‘: _currentIndex -= operand; break; case ‘*’: _currentIndex *= operand; break; case ‘/’: _currentIndex /= operand; break; } Console.WriteLine( “Current value = {0,3} (following {1} {2})”, _currentIndex, @operator, operand); } } class User { // Initializers private Calculator _calculator = new Calculator(); private List<ICommand> _commands = new List<ICommand>(); private int _currentIndex = 0; public void RedoCalculation(int levels) { Console.WriteLine(“\n—- Redo {0} levels “, levels); // Perform redo operations for (int i = 0; i < levels; i++) { if (_currentIndex < _commands.Count – 1) { ICommand command = _commands[_currentIndex++]; command.Execute(); } } } public void UndoCalculation(int levels) { Console.WriteLine(“\n—- Undo {0} levels “, levels); // Perform undo operations for (int i = 0; i < levels; i++) { if (_currentIndex > 0) { ICommand command = _commands[–_currentIndex] as ICommand; command.UnExecute(); } } } public void Calculate(char @operator, int operand) { // Create command operation and execute it ICommand command = new CalculationCommand( _calculator, @operator, operand); command.Execute(); // Add command to undo list _commands.Add(command); _currentIndex++; } } |
Iterator Design Pattern
Introduction:
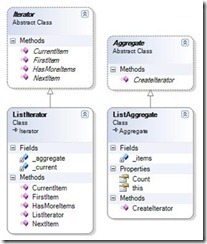
Sometimes you want to access a collection of objects in a sequential way without even expose how things is going inside your implementation . Iterator Design Pattern Provides you with a Skelton of how to design your classes to solve this issue.
Example:
| static void Main(string[] args) { ListAggregate a = new ListAggregate(); a[0] = “Item A”; a[1] = “Item B”; a[2] = “Item C”; a[3] = “Item D”; // Create Iterator and provide aggregate ListIterator i = new ListIterator(a); Console.WriteLine(“Iterating over collection:”); string item = i.FirstItem(); while (item != null) { Console.WriteLine(item); item = i.NextItem(); } // Wait for user Console.ReadKey(); } class ListIterator : Iterator { private ListAggregate _aggregate; private int _current = 0; // Constructor public ListIterator(ListAggregate aggregate) { this._aggregate = aggregate; } // Gets first iteration item public override string FirstItem() { return (string)_aggregate[0]; } // Gets next iteration item public override string NextItem() { string ret = null; if (_current < _aggregate.Count – 1) { ret = (string)_aggregate[++_current]; } return ret; } // Gets current iteration item public override string CurrentItem() { return (string)_aggregate[_current]; } // Gets whether iterations are complete public override bool HasMoreItems() { return _current >= _aggregate.Count; } } class ListAggregate : Aggregate { private ArrayList _items = new ArrayList(); public override Iterator CreateIterator() { return new ListIterator(this); } // Gets item count public int Count { get { return _items.Count; } } // Indexer public string this[int index] { get { return (string)_items[index]; } set { _items.Insert(index, value); } } } abstract class Iterator { public abstract string FirstItem(); public abstract string NextItem(); public abstract bool HasMoreItems(); public abstract string CurrentItem(); } abstract class Aggregate { public abstract Iterator CreateIterator(); } |
Mediator Design Pattern
Introduction:
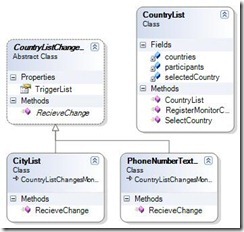
Sometimes you want to design your classes set that interact with each other in a loosely coupled manner by keeping your classes away from referring each other directly… Mediator Design Pattern solve this issue by promoting the idea of loosely coupling classes
Example:
| static void Main(string[] args) { CountryList countrylist = new CountryList(); CityList city = new CityList(); countrylist.RegisterMonitorChangers(city); Console.WriteLine(“——————-“); Console.ReadKey(); } abstract class CountryListChangesMonitorBase public abstract void RecieveChange(string countryName); class CountryList List<CountryListChangesMonitorBase> participants = new List<CountryListChangesMonitorBase>(); public CountryList() } public void SelectCountry(string countryName) foreach (CountryListChangesMonitorBase p in participants) public void RegisterMonitorChangers( CountryListChangesMonitorBase monitor) monitor.TriggerList = this; } class CityList:CountryListChangesMonitorBase class PhoneNumberTextBox: CountryListChangesMonitorBase |
Interpreter Design Pattern
Introduction:
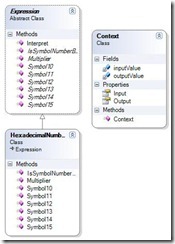
Sometimes you want to define a grammar for special language for certain reasons. After defining the syntax of this language, you need to build an interpreter to interpret the language and do actions accordingly. Interpreter Design Pattern help you to define a well structure object oriented classed to parse your expressions against the new language you defined
Example:
| static void Main(string[] args) { string hxNumber = Console.ReadLine(); // Hexadecimal number Context context = new Context(hxNumber); HexadecimalNumber hex = new HexadecimalNumber(); hex.Interpret(context); Console.WriteLine(“{0} HexaDecimal Numbering System = {1} Decimal Numbering System” ,hxNumber, context.Output); // Wait for user Console.ReadKey(); } class HexadecimalNumber :Expression { public override string Symbol10() { return “A”; } public override string Symbol11() { return “B”; } public override string Symbol12() { return “C”; } public override string Symbol13() { return “D”; } public override string Symbol14() { return “E”; } public override string Symbol15() { return “F”; } public override bool IsSymbolNumberBetween0To9(string num) { int tmpNum; return int.TryParse(num,out tmpNum); } public override int Multiplier() { return 16; } } abstract class Expression { public void Interpret(Context context) { if (context.Input.Length == 0) return; int value = 0; if (context.Input.StartsWith(Symbol10())) { value = 10; } else if (context.Input.StartsWith(Symbol11())) { value = 11; } else if (context.Input.StartsWith(Symbol12())) { value = 12; } else if (context.Input.StartsWith(Symbol13())) { value = 13; } else if (context.Input.StartsWith(Symbol14())) { value = 14; } else if (context.Input.StartsWith(Symbol15())) { value = 15; } else if (IsSymbolNumberBetween0To9(context.Input.Substring(0, 1))) { value = int.Parse(context.Input.Substring(0, 1)); } else { Console.WriteLine(“Invalid Hexadecimal Number!”); context.Output = 0; return; } context.Input = context.Input.Substring(1); context.Output += (int)(value * Math.Pow(Multiplier() , context.Input.Length )); Interpret(context); } public abstract string Symbol10(); public abstract string Symbol11(); public abstract string Symbol12(); public abstract string Symbol13(); public abstract string Symbol14(); public abstract string Symbol15(); public abstract bool IsSymbolNumberBetween0To9(string num); public abstract int Multiplier(); } class Context { private string inputValue; private int outputValue; // Constructor public Context(string input) { this.inputValue = input; } // Gets or sets input public string Input { get { return inputValue; } set { inputValue = value; } } // Gets or sets output public int Output { get { return outputValue; } set { outputValue = value; } } } |
Proxy Design Pattern
Introduction:
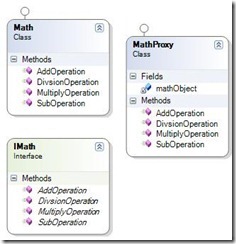
Sometimes you become into a case where you does not or can not reference an object directly, but you still want to interact with that object to do some job. The intent of the proxy design pattern is to control access to an object by providing placeholder for it. Below example will make the idea clear to you.
Example:
| static void Main() { // Create proxy Class MathProxy proxy = new MathProxy(); // Call Methods Console.WriteLine(“4 + 2 = ” + proxy.AddOperation(4, 2)); Console.WriteLine(“4 – 2 = ” + proxy.SubOperation(4, 2)); Console.WriteLine(“4 * 2 = ” + proxy.MultiplyOperation(4, 2)); Console.WriteLine(“4 / 2 = ” + proxy.DivsionOperation(4, 2)); // Exit Console.ReadKey(); } public interface IMath { double AddOperation(double a, double b); double SubOperation(double a, double b); double MultiplyOperation(double a, double b); double DivsionOperation(double a, double b); } class Math : IMath { public double AddOperation(double a, double b) { return a + b; } public double SubOperation(double a, double b) { return a – b; } public double MultiplyOperation(double a, double b) { return a * b; } public double DivsionOperation(double a, double b) { if (b == 0) return 0; return a / b; } } class MathProxy : IMath { private Math mathObject = new Math(); public double AddOperation(double a, double b) { return mathObject.AddOperation(a, b); } public double SubOperation(double a, double b) { return mathObject.SubOperation(a, b); } public double MultiplyOperation(double a, double b) { return mathObject.MultiplyOperation(a, b); } public double DivsionOperation(double a, double b) { return mathObject.DivsionOperation(a, b); } } |
Flyweight Design Pattern
Introduction:
Flyweight design pattern target to minimizes the memory usage by sharing as much data as possible with other similar objects. It is very useful when have large amount of objects in memory which have lot of similar values. by sharing the similar values between all the objects, memory usage will be much less.
Example:
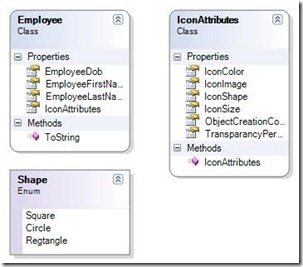
Suppose you want to create an application to manage Employees and form UI perspective you want to display Employees list as Icons and let user control how that icon looks like. But for all employees icons, you will have only one icon style.
All employees sharing the same icon’s attributes, thus there is no need to include the icon’s attributes inside the Employee class. By doing so, you will decrease memory utilization and accordingly make your application more efficient.
Below is a diagram that showing how we will use Flyweight design pattern
| enum Shape { Square, Circle, Regtangle }; class IconAttributes { public IconAttributes() { ObjectCreationCounter++; } public static int ObjectCreationCounter{ get; set; } public Color IconColor { get; set; } public Size IconSize { get; set; } public Shape IconShape { get; set; } public Image IconImage { get; set; } public int TransparancyPercentage { get; set; } } class Employee { public IconAttributes IconAttributes { get; set; } public string EmployeeFirstName { get; set; } public string EmployeeLastName { get; set; } public DateTime EmployeeDob { get; set; } public override string ToString() { return “FirstName: ” + EmployeeFirstName + ” LastName: ” + EmployeeLastName +Environment.NewLine + ” Dob: ” + EmployeeDob.ToString () + Environment.NewLine + “Icone Coloe” + IconAttributes.IconColor.ToString() + ” Icon Shape: ” + IconAttributes.IconShape.ToString()+ Environment.NewLine + “=====================================” + Environment.NewLine; } } static void Main(string[] args) { IconAttributes iconAttribue = new IconAttributes(); iconAttribue.IconColor = Color.Red; iconAttribue.IconShape = Shape.Regtangle; iconAttribue.IconSize = new Size(10, 10); iconAttribue.TransparancyPercentage = 100; Employee e; List<Employee> employees = new List<Employee>(); for (int i = 0; i < 5; i++) { e = new Employee(); e.EmployeeFirstName = “FirstName ” + i.ToString(); e.EmployeeLastName = “LastName ” + i.ToString(); e.EmployeeDob = new DateTime(1982, 3, 20); e.IconAttributes = iconAttribue; employees.Add(e); } foreach (Employee emp in employees) { Console.WriteLine(emp.ToString()); } Console.WriteLine(“++++++++++++++++++++++++++++++++++++++++”); Console.WriteLine(“ObjectCreationCounter for IconAttributes : ” + IconAttributes.ObjectCreationCounter.ToString()); Console.ReadKey(); } |

