Use Windows Phone Personal Assistant (Cortana) Outside US

Microsoft recently push windows phone 8.1 updates to all windows 8.0 devices. The major feature of this update was to include an interactive personal assistant software; Cortana.. it is like Siri on IPhone an Google Now on Andriod devices.. Cortana is Beta release now and it is enabled only for US area.. the good news is you can still use cotana while you are a non-US resident by following few steps to adjust the regional settings on your device. to accomplish that you need to do the followings:

1. your phone language should be English (united State); to do so, go to Settings > Language and make sure the first item on the list to be English (United States). your phone may ask for restart; if so, please do restart for your phone.

2. your region should be United state. to do so; go to Settings > Region and make sure the region is US and regional format to be US… your phone might require a restart, if so, please do a restart for your phone.

3. the last step is to make sure that you set the Location Services to be ON; this will enable GPS on your phone Cortana will use it in order to accomplish your commands. To do that; go to Settings > Location and make sure it is set to ON.


after restarting your phone, you should see cortana on your App list. swap to the left and search for Cortana and you are there.. to start it; you can use the search button on your  mobile devise..


similar article: http://www.wpcentral.com/want-cortana-outside-us-heres-how


Responsive Web Design

Responsive web design is a web design approach that is aimed at crafting sites to provide an optimal viewing experience, easy reading and navigation with minimal efforts of resizing, panning, and scrolling – across wide range of devices including mobile, tablets and desktop devices. Mainly the Responsive web design position the page content in a fluid, proportion-based grids, flexible images, and CSS3 media queries, an extension of the @media rule.

Mobile and tablet devices adoption is rapidly grow all over the world; thus it is becoming more critical to have websites that looking good in those devises and make users feel comfortable while using your website on small screens as well as on large screens. Based on recent stats on the market, the sales for mobile and tablet devices overtake the sales for desktop devices which is making to have your website looking good on those devices essential for your organization success.

When you start thinking of having website that looks good on mobile and tablet devices , you will have 2 options;

  • Build a separated website for mobile devices and another one for desktop.
  • Using responsive design technique to have single website that works on both desktop and mobile devices.

Both options are valid and debatable… each of these options has its own pros and cons. Which one to adopt and go with depends on your business and what factors to consider. It is not the target


Google in general is recommending to go with Responsive web design approach… it will help you a lot in many areas.. For me, I hate code duplication. For the marketing guys they hate to duplicate the marketing content in many places.. Responsive web design will help on solving both problems and make those things centralized in one place and get rid of the headache of duplicated code/contents.

SOLID Object-Oriented-Design Principles

One of the main principles of OOD (Object Oriented Design) is SOLID principles. SOLID is stands for :

1. Single Responsibility Principle:

This means the class has to have one and only one reason to responsibility. This responsibility should be encapsulated by the class.

2. Open/closed principle:

The open/closed principle states that software entities (classes, modules, functions, …etc) should be open for extension, but not for (closed) modification

This will be very helpful on the production environment where fixing and enhancing certain area is required without affecting other areas. thus you will go with extending the class and its behaviors without modifying the current existing code/methods

3. Liskov substitution principle:

means Substitute-ability; It states that, if SubclassA is a sub-type of MainTypeA, then objects of type MainTypeA may be replaced with objects of type SubclassA without altering any of the properties of that program

4. Interface segregation principle:

The main goal from this point is to make the software more maintainable and loosely coupled; thus easier to re-factor and change. Basically, we need to split the large interfaces into smaller interfaces so that the client classes will be aware of the methods/properties they concern about

5. Dependency inversion principle:

It is about decoupling software layers and making sure the software is loosely coupled. Basically this principle states 2 things:

– High-level modules/layers should NOT depend on low-level modules/layers. communication between modules and layers should go through abstractions.

– Abstractions should NOT depend on details and the Details should depend on abstractions.


IIS 7 – How to Resolve Error HTTPs 413: Request Entity Too Large

couple of days ago, I came across an issue where when user leave the web page idle and try to upload a file using JQuery-FileUpload; user was getting error 413. and sometimes users were getting “The page was not displayed because the request entity is too large.” error.

I increased the uploadReadAheadSize  value on IIS and that was enough to fix the issue; I did the followings:

  1. Launch “Internet Information Services (IIS) Manager”
  2. Select the site that you are hosting your web application under it.
  3. In the Features section, double click “Configuration Editor”
  4. Under “Section” select: system.webServer  then serverRuntime
  5. Modify the “uploadReadAheadSize” section to be like 20MB (the value there is in Bytes)
  6. Click Apply

The error is happening as during renegotiation step between your web browser and the IIS Server; the entity should be preloaded using SSL. and result is being larger than the default value which is ~49K

GPG Encryption with a trust keys

before I start describing the issue, I want to give you a quick introduction about GPG and why we need to use it

GPG is one of the great tools/algorithms to do encryption and it is one of the commonly used algorithms to secure data and files. GPG allowing you to use public/private keys to encrypt/decrypt files on both Windows and Linux Operating Systems. Public key is used to encrypt files ONLY, and you can’t use it to Decrypt files; to be able to decrypt files, you need to have the private key pair to the public key used in encryption. if so, you will be able to decrypt the files.

How to generate keys and how to use them is outside the scope of this article; so I’ll not describe them here and I assume you are familiar with these commands.

the main issue that I faced while trying to encrypt files is getting the following prompt message:

“It is not certain that the key belong to the person named in the user ID. if you *really* know what you are doing, you may answer the next question with yes.

while you are doing encryption manually, it is easy to do YES. but when you are using this inside a background process that doesn’t work and you need to let the GPG tool do encryption silently. to do this you need to trust public key that you are using. it is easy thing to do; follow the below steps:

gpg – edit-key <KeyName>

GPG will output some information, and show a line like:
trust: undefined     validity: unknown

then you need to use trust command; type “trust”:
trust

GPG will output below message:

Please decide how far you trust this user to correctly verify other users’ keys
(by looking at passports, checking fingerprints from different sources, etc.)

1 = I don’t know or won’t say
2 = I do NOT trust
3 = I trust marginally
4 = I trust fully
5 = I trust ultimately
m = back to the main menu

Your decision? 5
Do you really want to set this key to ultimate trust? (y/N) y

and we are done.. you need to quit from the command by type q then hit enter.

Fix Installer issue – FIX IT

while I was developing windows service using visual studio 2010, I came a cross an issue that prevent me from continue working. I wasn’t able to uninstall or install my service any more.  I was using windows installation project within Visual Studio on windows 7 PC.

I tried so many things with no luck. I even tried to use the command prompt commands trying to uninstall/install the service; but nothing could solve the issue. till I found a tool from MS that could successfully scan and fix the problem for me. The tool took like 10 min scanning my machine; but at the end it fixed the issue for me. here is the link to the tool http://support.microsoft.com/mats/Program_Install_and_Uninstall

Please let me know if this tool fix the issue for you as well or not?

Value Injector – How to Use

One of the main tasks that you may face during development is how to translate from one object to another that is very similar in term of properties and attributes. There are many ready to use code to be downloaded from Internet and use.

I tried Value Injector DLL; it was good enough for my needs and it satisfy my needs in very good way. you can download the Value Injector DLL from this link.

The overall performance of this component was very good and it didn’t hit the performance of the system that I’m working on.

The Basic usage of this component is as follow.

using Omu.ValueInjecter;
public class DemoClass { 
 public void MethodInjector(mySourceClass source)
  {
   MyClass destination = new MyClass();
   destination.InjectFrom(source);
   //inject using your own injector calss.
   destination.InjectFrom < MyInjection > (source);
  }
}

The good thing about ValueInjector is that you can build your own Injector class and use it; that is needed if the current implementation for ValueInjector is not satisfying your needs.

for more information about value injector, please visit this link

Creating Required Literal for MVC with Razor rendering engine

In web applications, It is became a standard to have a symbol indicating if the field is required or not. This symbol maight be a star, icon or any verbiage that a client ma requested to have. It is a good practice to have the logic that render this symbol in one place and have all of your views using it. You can do that easily in standard ASPX pages, and it is the same on MVC using Razer rendering engine (cshtml/vbhtml). For MVC you need to create a custom HTML helper that do the job for you, and using it in your views cross the board. Below is a sample HTML helper method


public static MvcHtmlString RequiredFieldIcon(this HtmlHelper helper)
{
TagBuilder tag = new TagBuilder(“span”);
tag.AddCssClass(“color-color-text”);
tag.Attributes.Add(“title”, “Field is required”);
tag.SetInnerText(“>> “);
return MvcHtmlString.Create(tag.ToString(TagRenderMode.Normal));
}

In above method, the symbol is as simple as ‘>>’ in red color; using CSS class for that. it might be more complicated UI control and you can customize it based on your requirement. You can use this method just as if it is one of the out of the box HTML helpers that shipped with MVC; you just need to make sure you are including the namespace of the class that hosting this HTML helper method.

@Html.RequiredFieldIcon()

Using Google Calculator for Money Exchange

While working in one of the projects, one of the main requirements was to do money exchange from a specific currency to another. When I was looking into this functionality, I thought that is going to be a hard thing to be implemented as it is touching a critical area related to money. in fact, Thanks to Google calculator.. implementing such a functionality was a very easy job and it took from me like 1 hour to be done… Google Calculator has a very easy to be consumed APIs. below code explaining how could I consume Google Calculators to get the up to date exchange rate between 2 different currencies.

   /// <summary>
/// Currency Exchange Service that is responsible
/// </summary>
public class CurrencyExchangeService
{private static string GoogleCalculatorApiUrl
{
get
{
return “http://www.google.com/ig/calculator?hl=en&q={0} {1} to {2}”;
}
}

/// <summary>
/// Do currency Exchange between currencies.
/// </summary>
/// <param name=”fromCurrencyCode”>Source Currency Code</param>
/// <param name=”toCurrencyCode”></param>
/// <param name=”amountToConvert”></param>
/// <param name=”roundedDecimalPoints”></param>
/// <returns></returns>
public static decimal ConvertCurrency(string fromCurrencyCode, string toCurrencyCode, decimal amountToConvert = 1, int roundedDecimalPoints = 4)
{
if (fromCurrencyCode == null)
throw new ArgumentNullException(“fromCurrencyCode”);
else if (toCurrencyCode == null)
throw new ArgumentNullException(“toCurrencyCode”);
else if (amountToConvert < 0)
throw new ArgumentOutOfRangeException(“amountToConvert”);

if (string.Compare(fromCurrencyCode, toCurrencyCode, true) == 0)
return amountToConvert;
else if (amountToConvert == 0)
return 0;

var request = HttpWebRequest.Create(string.Format(GoogleCalculatorApiUrl, amountToConvert, fromCurrencyCode, toCurrencyCode));
request.Timeout = 5000;
using (var response = request.GetResponse())
{
using (var stream = new StreamReader(response.GetResponseStream(), Encoding.GetEncoding(“iso-8859-1”)))
{
Match match;
if ((match = Regex.Match(
stream.ReadLine(),
@”{lhs: “”(?<From>[0-9.\s]+)(.*?)””,rhs: “”(?<To>[0-9.\s]+)(.*?)””,error: “”(?<Error>(.*?))””,icc: (true|false)}”,
RegexOptions.Singleline | RegexOptions.IgnoreCase)
).Success)
{
//Parse response from Google Calculator.
var result = new
{
From = Regex.Replace(match.Groups[“From”].Value, “[^0-9.]”, string.Empty),
To = Regex.Replace(match.Groups[“To”].Value, “[^0-9.]”, string.Empty),
Error = match.Groups[“Error”].Value
};

if (string.IsNullOrEmpty(result.Error))
{
return Math.Round(Convert.ToDecimal(result.To, CultureInfo.InvariantCulture), roundedDecimalPoints);
}

throw new Exception(string.Format(“Converter error: {0}.”, result.Error));
}

throw new Exception(“Response format error.”);
}
}
}
}

How to Create Pivot Tables with MS Excel

Usually when you have a large list of data; you will need to have summary and statistics out from this list to take decisions. I mean by summary things like:

1. How many records do we have under certain category?

2. What is the best time that my product is being sold?

3. How my salespersons performing during the course of certain period?

The easiest way to get the answers of the above questions is to create a pivot table on Microsoft Excel. Pivot tables are interactive tables where it extract data and summaries the data in a more meaningful format. It will make it easy to analyze and make comparisons detect what kind of decisions you need to do.

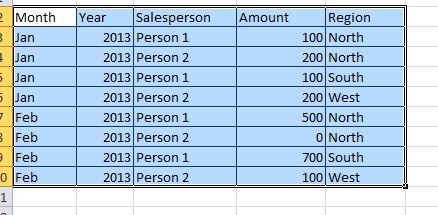
Let’s assume that we have the following list and we need to extract summary data from it.

datasource snapshot image


to create pivot table do the followings:

1. highlight your data table.

2. from insert tab; Click on Pivot table

3. make sure the Table/Range is selecting the correct range of data that you need to create your report against.

4. Click OK

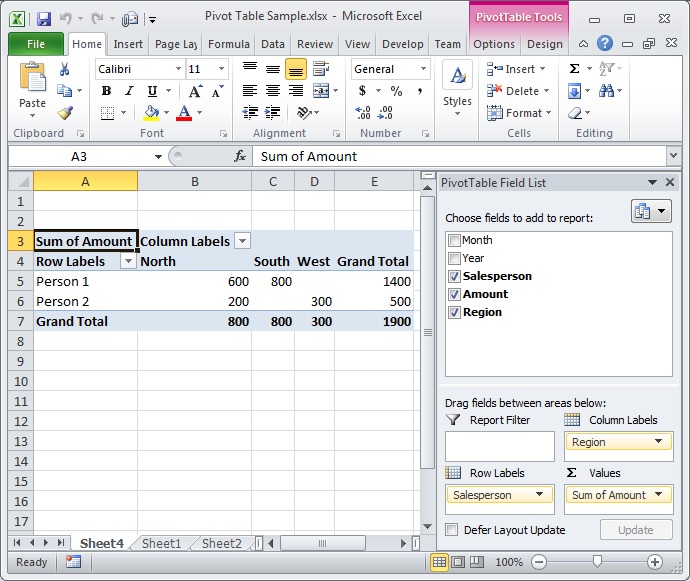
5. Configure your items as showing on the below snapshot


pivot table snapshot table


I would recommend to play with the columns and rows to let you understand the concept in a solid way. using Pivot table will save time and effort when you are create reports to take decision up on. I’m attaching sample data here if you would like to download and play with it.